Recent posts
#21
Client Projects & Tips – Tube Chassis / Re: 65 Buick Skylark
Last post by Scot McMillan Jr - Apr 24, 2026, 05:33 PM
#22
Client Projects & Tips – Tube Chassis / 65 Buick Skylark
Last post by Scot McMillan Jr - Apr 24, 2026, 05:10 PM

#23
Client Projects & Tips – Muscle Cars / Re: 14 SHUSH Mustang
Last post by Scot McMillan Jr - Apr 24, 2026, 04:49 PM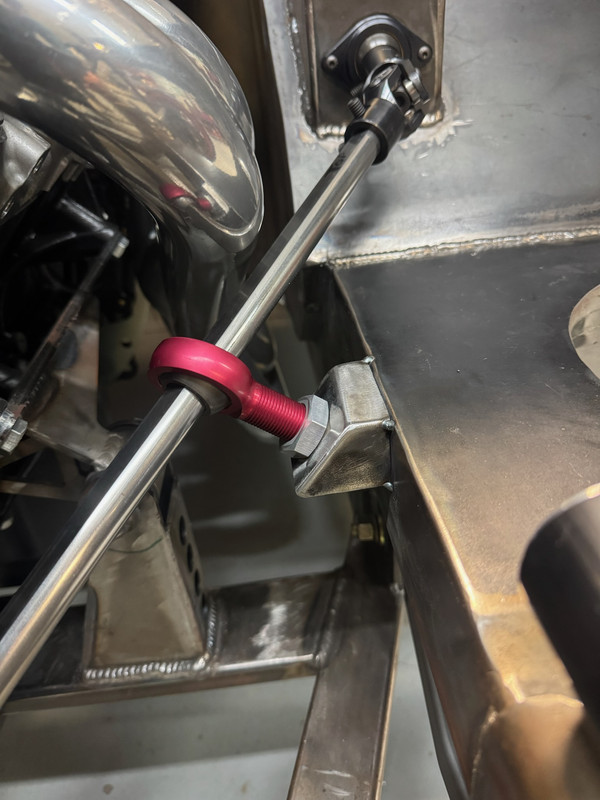
#24
Designing In Safety for Track & Racing / Re: Building Track & Race Cars...
Last post by Ron Sutton - Apr 23, 2026, 05:06 PMRoll Bar Padding
You do not want your helmet hitting the steel tubing of a cage or roll bar. Having at least 2" of helmet-to-roll-bar clearance is critical because the belts will stretch that much ... so 3" is better and 4" is best. Having the proper density padding on the bars is also essential in reducing head injuries. Do not use "just any old foam" as most are too soft, which makes them practically useless. More false security.
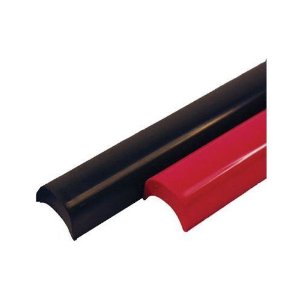
Use the padding that is SFI approved for roll bars. SFI has worked out the proper density to absorb a majority of the impact in a hard crash. I use the profiled mini-padding, that is thinner on the sides and thick where your head may contact it.
For Pete's sake ... street guys, do not kid yourself into thinking roll bar padding will cushion the blow enough for your helmet-less head hitting the roll bar. (Who is this Pete guy anyway?)
Racing & Full Containment Seats:
I can not comment much on street seats because I don't run them. This is probably a generalized over statement, but I consider most street seats to be unsafe in racing environments. I'm sure there are exceptions. Please don't flame me telling me how safe your street seats are.
I look at it this way ...
• If your seat back folds forward and/or back ... that mechanism can break in an impact.
• If your seat has the typical factory slider with small tab that grabs on one side ... that mechanism can break in an impact, sliding you into the steering wheel.
• If your seat is soft & cushy ... you are not being properly supported for 1.5+ g cornering forces.
• If your seat doesn't have rigid side supports for your hips & torso ... you are not being properly supported for 1.5+ g cornering forces.
So this section is about racing seats. For safety, your racing seat needs to:
• Hold the driver securely in place for racing
• Not move, shift, fold or deform in a crash
• Not break free in a crash
• Hold your torso in place during a crash
Driver weight ... along with speed, g-forces, etc, plays a role in proper seat selection.
The heavier a driver is, the stronger the seat needs to be built to not "fold up" under hard impacts. Racing seat manufacturers are in a tough spot, because the "it won't happen to me" idiot racers buy seats that are light & cheap. So they need to offer light & cheap seats or they will miss sales to their competitors.
This advice is simple ... don't be an idiot by buying the cheapest & lightest seat like this ... If you can literally flex your seat by moving around in it (parked) ... well that my friends is what we call a clue. The seat needs to be strong enough to hold a heavy mass (you) in place during a high-G crash. Do not buy into the myth that the seat needs to flex with you. The seat & 5-7 point harness need to work together to contain you from flinging around in the cockpit in bad crashes. So paper thin "economy racing seats" with no bracing should not be considered safe.
A racing seat's strength comes from four primary things:
• Material
• Wall thickness
• Number of layers
• Bracing around back & sides of seat

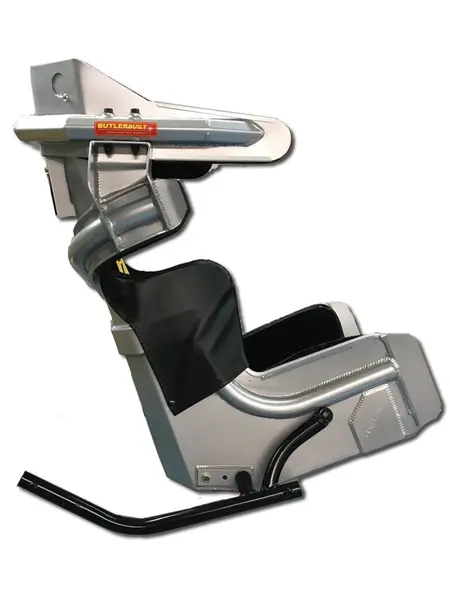
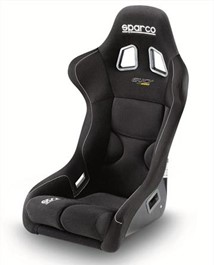
The very, very top of the food chain in safety are Hendrick Motorsports full containment seats made of carbon fiber (above). They cost OVER $12,000. In high end racing, where the budget is there, I feel these are the way to go. A close second are the aluminum Butlerbuilt SFI 39.1 racing seats (below). These cost $6-7K. They are used by more NASCAR racers than the Hendrick seat, due to the cost difference I suspect.
That is out of budget range for most Track Car guys. No worries. There are very good seats in the $1000 to $2000 range. But forget that cheap $399 crap. Again, this is your life we're talking about. It's important to know that the material alone is NOT the deciding factor. There are great, good, just OK & poor levels of safety in aluminum & composite seats.
By composite, I mean fiberglass, Kevlar and/or carbon fiber. The design, thickness & processes all play a role. Cost is sometimes an indicator, but there are some bargains. I wish I could just give you a wall thickness for each body weight range, but bracing design differences make this more complex. Bracing or reinforcement around the torso area of the seat increases it rigidity and is very important.
Here are some sample aluminum seat design parameters with my "acceptable" driver weight suggestions for road course duty:
• Economy: .090"-.100" wall aluminum seat with no torso bracing (100-120#)
• Economy Plus: .125" wall aluminum seat with no torso bracing (120-140#)
• Mid-level: .090"-.100" wall aluminum seat with minor torso bracing (140-150#)
• Mid-level Plus: .125" wall aluminum seat with minor torso bracing (150-170#)
• High level: .090"-.100" wall aluminum seat with major torso bracing (170-200#)
• High level Plus: .125" wall aluminum seat with major torso bracing (200# +)
• High level Plus: .090"-.100" double wall aluminum seat in torso area (200# +)
Let's talk full containment seats ...
Two safety innovations in the last 20 years have saved an amazing amount of lives ... and probably an even larger number of drivers from being paralyzed. The HANS devices & full containment seats. They can't save yours unless you utilize them.
Why? How?
Simple. Neck injuries kill or paralyze drivers in hard crashes. HANS devices prevent the head from snapping forward too far in head on crashes. This prevents broken necks. But the HANS devices do nothing in side impacts. Full Containment seats prevent the head from snapping sideways too far in side impact crashes.
What does "Full Containment" mean?
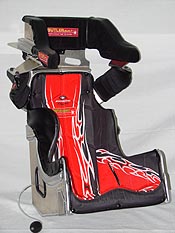
In addition to holding your torso in place ... the seat has two additional "wrap around" supports ... one for your shoulders and one for you head/helmet. (See photos below)

-360x360.jpg)
Here are some guidelines for full containment seats:
• Use the guide above in selecting the lower & torso area design of the seat.
• It is "ok" to add on head & shoulder supports to an existing seat as long as they are mounted in the correct spot & attached securely.
• It is "ok" to add shoulder supports by themselves, but this is not "full containment."
• Never add a head support without shoulder supports. That can cause a broken neck.
• The shoulder supports need to be close enough to your shoulders when driving to limit side movement in an impact, without limiting your steering movement.
• The head supports need to be close enough to your head when driving to limit side movement in an impact, without limiting your ability to turn your head 20° or so.
• The head supports need to be high enough to support the side of your helmet, but not so tall as to impede your vision above the front tips.
STAY AWAY FROM:
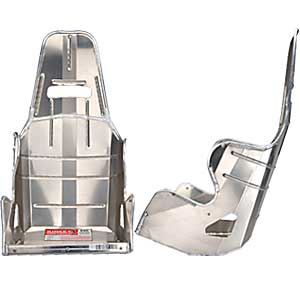
* Non Full Containment Seats ... like both seats below
* Single layer seats without structural support ... like the aluminum seat below.
Fit:
This is simple. The seat needs to fit you very snuggly on the sides and offer support under your thighs. If the seat is too wide, you'll just move around in the seat and have a hard time driving well or safely. Do NOT rely on the seat belt harness to hold you in a seat that is too big. Under high G loads ... especially in the 1.5g to well over 2g range we see on road courses ... your torso will slide side to side. The harness "stretches" under these loads.
Then you find yourself trying to "hang on for dear life" to the steering wheel. That's no way to drive fast cars. You want to be snug & secure in the seat (side to side) and snug (down & back) in the seat with tight harness adjustment. Then your body is secure at 150mph & 1.5g-2g ... and you can relax and steer the race car. Anything less is dangerous and leads to lower driver performance and inconsistency.
Can't say this strongly enough ... get a seat that fits well, even if that means custom order.
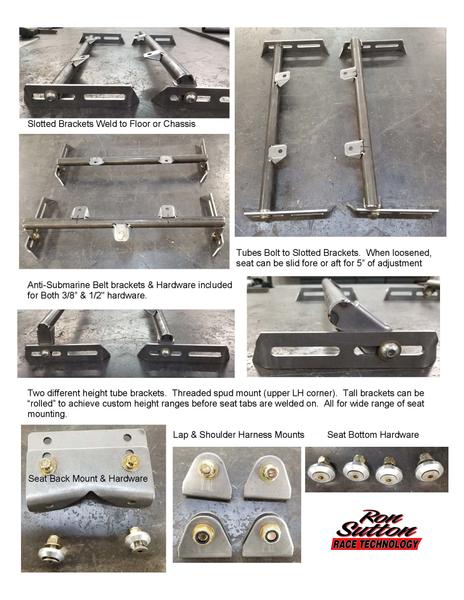
IMHO, the mounting of an seat to steel tubing rails underneath is the strongest, safest method. Using aluminum "sheetmetal" on the sides is cheaper, lighter, less safe way of doing things.
IMHO, all seats need to be mounted at 6 points:
* 2 on a steel tube rail under the front of the seat ... to a bracket on the chassis tubing.
* 2 on a steel tube rail under the back of the seat (if space allows) or behind the lower back of the seat ... to a bracket on the chassis tubing.
* 2 behind the seat ... with a steel or aluminum plate ... ... to a bracket on the main hoop crossbar tubing.
Be smart. Be safe out there. Don't let the lack of safety rules in what we're doing in Pro-Touring guide your decisions. These are race cars, running race car level power, brakes, suspensions ... and therefore race car grip & speeds ... on race tracks.
HANS space:
Even you don't use a HANS device now ... make sure there is room in between your helmet & the seat head rest for a HANS device. Some seat designs do & some don't. Some have to be stepped back, while others are simply angled. Regardless, make sure your seat has space for you to run a HANS. I see the trends coming & suspect someday they will be mandatory in all of motorsports, just like a helmet.
Seat Mounting:
How the seats mounted is just as important as all the other stuff combined. A quick little math exercise. Add your weight with suit & driver gear to the seat weight ... accelerate that to 120-150mph (or more if you plan to) ... then stop that weight instantly from a sudden impact into a barrier. This makes it real clear that we need to mount the seat strong. Super strong. Sure ... your harness will help hold you in, but don't make it do more work than it was intended for.
Give the harness a helping hand by mounting the seat ...
• In multiple places
• In the right places
• With adequate sized bolts & bracket thickness.
IMHO, the mounting of an aluminum seat to steel tubing rails underneath is the strongest, safest method. Use aluminum "sheetmetal" on the sides is another cheap, light way of doing things.
IMHO, all seats need to be mounted at 6 points:
* 2 on a steel tube rail under the front of the seat ... to a bracket on the chassis tubing.
* 2 on a steel tube rail under the back of the seat (if space allows) or behind the lower back of the seat ... to a bracket on the chassis tubing.
* 2 behind the seat ... with a steel or aluminum plate ... ... to a bracket on the main hoop crossbar tubing.
You have 4 key mounting dimensions to get right:
1. Is the seat centered with the steering
2. Is the seat bottom square to the car
3. Is the layback angle optimum
4. Is the fore & aft location optimum for pedals, shifting, seeing, roll bar clearance, etc.
Tips:
• Take the time now ... in the shop ... to get the driver comfortable when first mounting the seat.
• Shop time is easy. Changing it at the track is a pain in the ass.
• Mock it up & have the driver sit in the seat for ½ hour or longer. If it's not optimum, adjust it.
• If the butt goes to sleep first, you need more leg support. If the legs go to sleep first, you need more butt support.
• Obviously, keep the mounting bolts out of sensitive areas. (I prefer round head bolts)
Work hardening:
Aluminum is a funny thing. If it is bolted down tight and doesn't flex or move around, it doesn't work harden. But if it flexes or moves around, it work hardens ... and cracks. If this happens at the mounting bolt holes ... the aluminum cracks & tears. So, make sure you bolt all points of the seat down securely ... and check the bolts occasionally to ensure the seat mounting points are not moving.
• P.S. If you have a "flexi-flyer" seat this will most likely happen anyway.
• P.P.S. If you have a seat that the mounting holes have cracked & torn, reinforce that area by welding in aluminum patches top & bottom.
I find composite seats ... fiberglass, Kevlar and/or carbon fiber do a similar thing. If the seat is not 100% secure or the bolts are not 100% tight ... the composite will oscillate on track & wear bigger holes than were drilled. We have seen it a bunch when seats come out of the car. Thank God they didn't crash. Because the composite seat would have come apart in a hard impact. Check your seat. Find wear? Have it fixed.
Recommendations:
I do not usually publicly endorse products, but for seats I make an exception. I have been a dealer for 7 of the top brands. From seeing how they are all built and years of experience seeing these seats in crashes, I often recommend ButlerBuilt. I believe their Advantage II Sportsman & Advantage II Speedway are the safest full containment racing seats in the under $2000 price range. And their EZ-3 Seat is the best full containment racing seats around $1000.
Plus Butlerbuilt ships when they say they will, and builds custom seats right the first time. So Butlerbuilt is my preferred brand of aluminum seat. There SFI 39.1 Seat is bad ass strong. It is used by a lot of professional racers in IMSA, NASCAR & Trans Am. Of course, carbon fiber seats are also used in those series. The Hendrick carbon fiber seats are the top of the safety food chain. But bring $12k & you might get lunch money back.
For affordable composite seats, fiberglass, Kevlar and/or carbon fiber, you can't go wrong with Sparco or RaceTech. Frankly the RaceTech stuff is a little beefier. So I recommend them over Sparco.
You do not want your helmet hitting the steel tubing of a cage or roll bar. Having at least 2" of helmet-to-roll-bar clearance is critical because the belts will stretch that much ... so 3" is better and 4" is best. Having the proper density padding on the bars is also essential in reducing head injuries. Do not use "just any old foam" as most are too soft, which makes them practically useless. More false security.
Use the padding that is SFI approved for roll bars. SFI has worked out the proper density to absorb a majority of the impact in a hard crash. I use the profiled mini-padding, that is thinner on the sides and thick where your head may contact it.
For Pete's sake ... street guys, do not kid yourself into thinking roll bar padding will cushion the blow enough for your helmet-less head hitting the roll bar. (Who is this Pete guy anyway?)
Racing & Full Containment Seats:
I can not comment much on street seats because I don't run them. This is probably a generalized over statement, but I consider most street seats to be unsafe in racing environments. I'm sure there are exceptions. Please don't flame me telling me how safe your street seats are.
I look at it this way ...
• If your seat back folds forward and/or back ... that mechanism can break in an impact.
• If your seat has the typical factory slider with small tab that grabs on one side ... that mechanism can break in an impact, sliding you into the steering wheel.
• If your seat is soft & cushy ... you are not being properly supported for 1.5+ g cornering forces.
• If your seat doesn't have rigid side supports for your hips & torso ... you are not being properly supported for 1.5+ g cornering forces.
So this section is about racing seats. For safety, your racing seat needs to:
• Hold the driver securely in place for racing
• Not move, shift, fold or deform in a crash
• Not break free in a crash
• Hold your torso in place during a crash
Driver weight ... along with speed, g-forces, etc, plays a role in proper seat selection.
The heavier a driver is, the stronger the seat needs to be built to not "fold up" under hard impacts. Racing seat manufacturers are in a tough spot, because the "it won't happen to me" idiot racers buy seats that are light & cheap. So they need to offer light & cheap seats or they will miss sales to their competitors.
This advice is simple ... don't be an idiot by buying the cheapest & lightest seat like this ... If you can literally flex your seat by moving around in it (parked) ... well that my friends is what we call a clue. The seat needs to be strong enough to hold a heavy mass (you) in place during a high-G crash. Do not buy into the myth that the seat needs to flex with you. The seat & 5-7 point harness need to work together to contain you from flinging around in the cockpit in bad crashes. So paper thin "economy racing seats" with no bracing should not be considered safe.
A racing seat's strength comes from four primary things:
• Material
• Wall thickness
• Number of layers
• Bracing around back & sides of seat
The very, very top of the food chain in safety are Hendrick Motorsports full containment seats made of carbon fiber (above). They cost OVER $12,000. In high end racing, where the budget is there, I feel these are the way to go. A close second are the aluminum Butlerbuilt SFI 39.1 racing seats (below). These cost $6-7K. They are used by more NASCAR racers than the Hendrick seat, due to the cost difference I suspect.
That is out of budget range for most Track Car guys. No worries. There are very good seats in the $1000 to $2000 range. But forget that cheap $399 crap. Again, this is your life we're talking about. It's important to know that the material alone is NOT the deciding factor. There are great, good, just OK & poor levels of safety in aluminum & composite seats.
By composite, I mean fiberglass, Kevlar and/or carbon fiber. The design, thickness & processes all play a role. Cost is sometimes an indicator, but there are some bargains. I wish I could just give you a wall thickness for each body weight range, but bracing design differences make this more complex. Bracing or reinforcement around the torso area of the seat increases it rigidity and is very important.
Here are some sample aluminum seat design parameters with my "acceptable" driver weight suggestions for road course duty:
• Economy: .090"-.100" wall aluminum seat with no torso bracing (100-120#)
• Economy Plus: .125" wall aluminum seat with no torso bracing (120-140#)
• Mid-level: .090"-.100" wall aluminum seat with minor torso bracing (140-150#)
• Mid-level Plus: .125" wall aluminum seat with minor torso bracing (150-170#)
• High level: .090"-.100" wall aluminum seat with major torso bracing (170-200#)
• High level Plus: .125" wall aluminum seat with major torso bracing (200# +)
• High level Plus: .090"-.100" double wall aluminum seat in torso area (200# +)
Let's talk full containment seats ...
Two safety innovations in the last 20 years have saved an amazing amount of lives ... and probably an even larger number of drivers from being paralyzed. The HANS devices & full containment seats. They can't save yours unless you utilize them.
Why? How?
Simple. Neck injuries kill or paralyze drivers in hard crashes. HANS devices prevent the head from snapping forward too far in head on crashes. This prevents broken necks. But the HANS devices do nothing in side impacts. Full Containment seats prevent the head from snapping sideways too far in side impact crashes.
What does "Full Containment" mean?
In addition to holding your torso in place ... the seat has two additional "wrap around" supports ... one for your shoulders and one for you head/helmet. (See photos below)
Here are some guidelines for full containment seats:
• Use the guide above in selecting the lower & torso area design of the seat.
• It is "ok" to add on head & shoulder supports to an existing seat as long as they are mounted in the correct spot & attached securely.
• It is "ok" to add shoulder supports by themselves, but this is not "full containment."
• Never add a head support without shoulder supports. That can cause a broken neck.
• The shoulder supports need to be close enough to your shoulders when driving to limit side movement in an impact, without limiting your steering movement.
• The head supports need to be close enough to your head when driving to limit side movement in an impact, without limiting your ability to turn your head 20° or so.
• The head supports need to be high enough to support the side of your helmet, but not so tall as to impede your vision above the front tips.
STAY AWAY FROM:
* Non Full Containment Seats ... like both seats below
* Single layer seats without structural support ... like the aluminum seat below.
Fit:
This is simple. The seat needs to fit you very snuggly on the sides and offer support under your thighs. If the seat is too wide, you'll just move around in the seat and have a hard time driving well or safely. Do NOT rely on the seat belt harness to hold you in a seat that is too big. Under high G loads ... especially in the 1.5g to well over 2g range we see on road courses ... your torso will slide side to side. The harness "stretches" under these loads.
Then you find yourself trying to "hang on for dear life" to the steering wheel. That's no way to drive fast cars. You want to be snug & secure in the seat (side to side) and snug (down & back) in the seat with tight harness adjustment. Then your body is secure at 150mph & 1.5g-2g ... and you can relax and steer the race car. Anything less is dangerous and leads to lower driver performance and inconsistency.
Can't say this strongly enough ... get a seat that fits well, even if that means custom order.
IMHO, the mounting of an seat to steel tubing rails underneath is the strongest, safest method. Using aluminum "sheetmetal" on the sides is cheaper, lighter, less safe way of doing things.
IMHO, all seats need to be mounted at 6 points:
* 2 on a steel tube rail under the front of the seat ... to a bracket on the chassis tubing.
* 2 on a steel tube rail under the back of the seat (if space allows) or behind the lower back of the seat ... to a bracket on the chassis tubing.
* 2 behind the seat ... with a steel or aluminum plate ... ... to a bracket on the main hoop crossbar tubing.
Be smart. Be safe out there. Don't let the lack of safety rules in what we're doing in Pro-Touring guide your decisions. These are race cars, running race car level power, brakes, suspensions ... and therefore race car grip & speeds ... on race tracks.
HANS space:
Even you don't use a HANS device now ... make sure there is room in between your helmet & the seat head rest for a HANS device. Some seat designs do & some don't. Some have to be stepped back, while others are simply angled. Regardless, make sure your seat has space for you to run a HANS. I see the trends coming & suspect someday they will be mandatory in all of motorsports, just like a helmet.
Seat Mounting:
How the seats mounted is just as important as all the other stuff combined. A quick little math exercise. Add your weight with suit & driver gear to the seat weight ... accelerate that to 120-150mph (or more if you plan to) ... then stop that weight instantly from a sudden impact into a barrier. This makes it real clear that we need to mount the seat strong. Super strong. Sure ... your harness will help hold you in, but don't make it do more work than it was intended for.
Give the harness a helping hand by mounting the seat ...
• In multiple places
• In the right places
• With adequate sized bolts & bracket thickness.
IMHO, the mounting of an aluminum seat to steel tubing rails underneath is the strongest, safest method. Use aluminum "sheetmetal" on the sides is another cheap, light way of doing things.
IMHO, all seats need to be mounted at 6 points:
* 2 on a steel tube rail under the front of the seat ... to a bracket on the chassis tubing.
* 2 on a steel tube rail under the back of the seat (if space allows) or behind the lower back of the seat ... to a bracket on the chassis tubing.
* 2 behind the seat ... with a steel or aluminum plate ... ... to a bracket on the main hoop crossbar tubing.
You have 4 key mounting dimensions to get right:
1. Is the seat centered with the steering
2. Is the seat bottom square to the car
3. Is the layback angle optimum
4. Is the fore & aft location optimum for pedals, shifting, seeing, roll bar clearance, etc.
Tips:
• Take the time now ... in the shop ... to get the driver comfortable when first mounting the seat.
• Shop time is easy. Changing it at the track is a pain in the ass.
• Mock it up & have the driver sit in the seat for ½ hour or longer. If it's not optimum, adjust it.
• If the butt goes to sleep first, you need more leg support. If the legs go to sleep first, you need more butt support.
• Obviously, keep the mounting bolts out of sensitive areas. (I prefer round head bolts)
Work hardening:
Aluminum is a funny thing. If it is bolted down tight and doesn't flex or move around, it doesn't work harden. But if it flexes or moves around, it work hardens ... and cracks. If this happens at the mounting bolt holes ... the aluminum cracks & tears. So, make sure you bolt all points of the seat down securely ... and check the bolts occasionally to ensure the seat mounting points are not moving.
• P.S. If you have a "flexi-flyer" seat this will most likely happen anyway.
• P.P.S. If you have a seat that the mounting holes have cracked & torn, reinforce that area by welding in aluminum patches top & bottom.
I find composite seats ... fiberglass, Kevlar and/or carbon fiber do a similar thing. If the seat is not 100% secure or the bolts are not 100% tight ... the composite will oscillate on track & wear bigger holes than were drilled. We have seen it a bunch when seats come out of the car. Thank God they didn't crash. Because the composite seat would have come apart in a hard impact. Check your seat. Find wear? Have it fixed.
Recommendations:
I do not usually publicly endorse products, but for seats I make an exception. I have been a dealer for 7 of the top brands. From seeing how they are all built and years of experience seeing these seats in crashes, I often recommend ButlerBuilt. I believe their Advantage II Sportsman & Advantage II Speedway are the safest full containment racing seats in the under $2000 price range. And their EZ-3 Seat is the best full containment racing seats around $1000.
Plus Butlerbuilt ships when they say they will, and builds custom seats right the first time. So Butlerbuilt is my preferred brand of aluminum seat. There SFI 39.1 Seat is bad ass strong. It is used by a lot of professional racers in IMSA, NASCAR & Trans Am. Of course, carbon fiber seats are also used in those series. The Hendrick carbon fiber seats are the top of the safety food chain. But bring $12k & you might get lunch money back.
For affordable composite seats, fiberglass, Kevlar and/or carbon fiber, you can't go wrong with Sparco or RaceTech. Frankly the RaceTech stuff is a little beefier. So I recommend them over Sparco.
#25
Designing In Safety for Track & Racing / Re: Building Track & Race Cars...
Last post by Ron Sutton - Apr 23, 2026, 12:53 PMRoll Cages:
O. When you up your game to a well designed roll cage with 8, 10, 12 or 46 points, you just increased the safety factor by triple, and the chassis rigidity too. Again, in unibody type cars, you will want it to connect to real frame structure as much as possible. The increase in torsional rigidity ... and the performance gains make this a double win.
P. The optimum set up for safety & performance, is to make the cage out of Chromoly for the best driver & passenger protection ... and make the front & rear bars out of DOM for crush zones in the event of front or rear impacts.
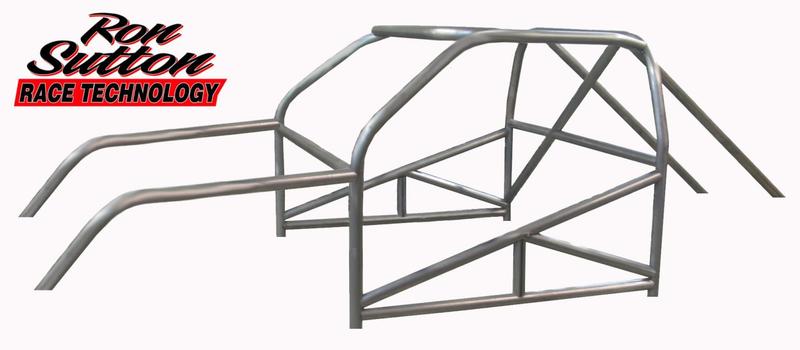
To me, this (below) is the least protection you should have in a Track Car. Anything less than this is simply ridiculous.
Adding a full X in the Door bar (below) and a brace from the rear down bars to the side of the main hoop are serious safety upgrades that can save your life in serious crash.
PLEASE FEEL FREE TO COPY MY ROLL CAGE DESIGNS. I don't care about selling you a roll cage. But I do want you to live in a crash.
Adding these X-brace "Dimple Die Gussets" (below) add a lot of strength from side impacts. Frankly it prevents the center of the X from breaking or caving in as much. The dimple die gusset in the rear adds strength protecting the driver cockpit in rear impacts.
------------------------------------------------------------------------------------------

True Tube Chassis:
Q. There is a big difference between cars with a roll cage added & a designed from scratch tube chassis, if they're designed right. After 40 years of racing, building race cars & designing race cars ... I STILL look for ways to improve the safety of my tube chassis designs. I still make upgrades and changes, when I learn something new.
Ryan Newman's Daytona wreck was a good example. He had requested a change in the cage design & it was granted. At Daytona in 2020, he crashed horribly. Everyone watching thought he was dead. Myself included. But the bars he had added actually saved his own life. I made upgrades after that to include the "Ryan Newman bars" to my Warrior chassis that see upper level speeds.
All of my Warrior tube chassis are designed with 5 zones. I make the cockpit cage structure as strong as needed, to survive the forces it can see in a bad crash, without caving in on the driver. In the front, I design in two crush zones. A soft crush zone, ahead of the engine. This is designed to absorb energy in a moderate crash, protecting the driver & the engine compartment. A medium crush zone starts at the engine. So only high g-load frontal impacts will collapse this frame section, to some degree. This allows the powertrain to be shoved rearward & down, avoiding the driver.
In the rear, I also design in two crush zones. A soft crush zone, behind the fuel cell. This is designed to absorb energy in a moderate crash, protecting the driver & the fuel cell. A medium crush zone starts at the rear axle. So only high g-load rear impacts will collapse that frame section, to some degree. This allows the fuel cell to be shoved forward & down.
The area where there is no crush zone? At the doors. This is why your door bar design is so critical. In side impacts, the main hoop & the door bars are primarily what is keeping the concrete barrier or other race car out of your lap. It's no joke. I have found doubling the cross bar in the main hoop really helps add strength in a side impact. So, it's standard on all Warriors. Same with the NASA bar. It adds much needed triangulation to the main hoop.
But you still need strong door bars in-between the driver & objects outside the race car. NASCAR style bars do this best. But if you don't do that, at least build the strongest door bars possible ... and high enough to actually protect you.
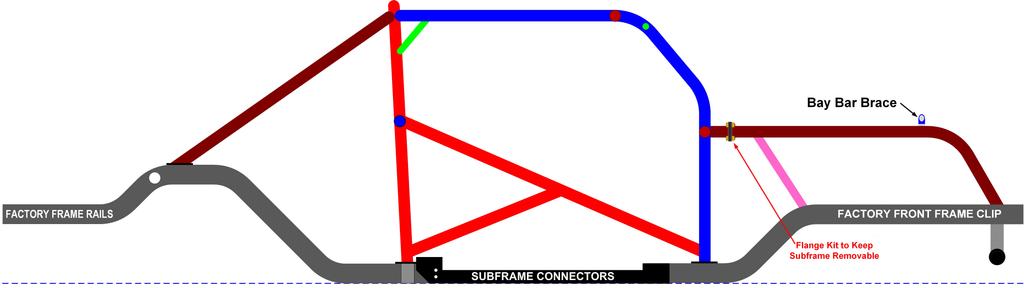
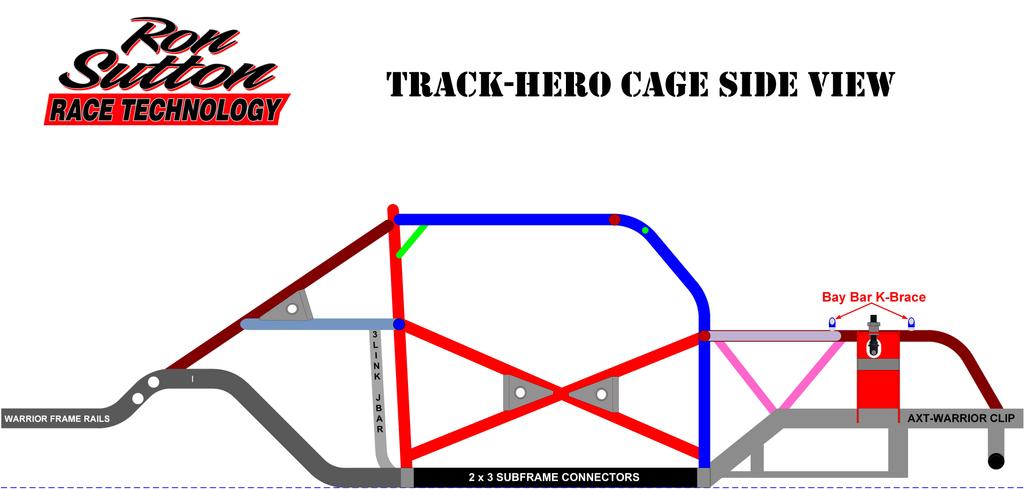
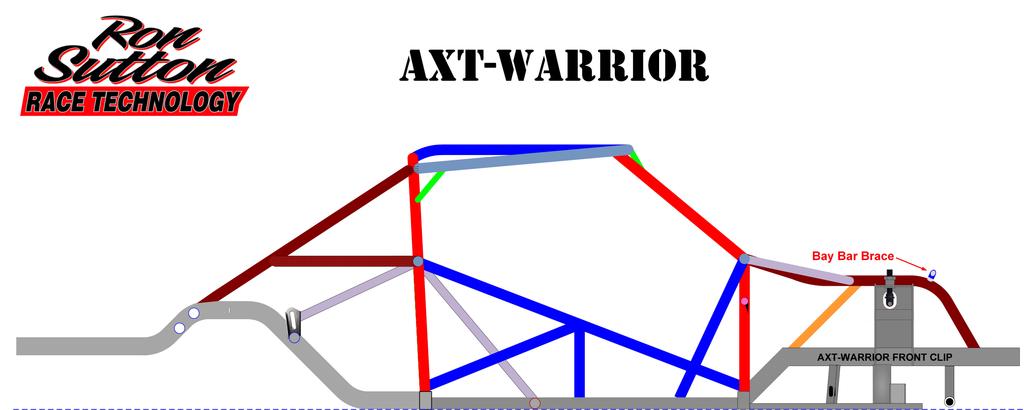
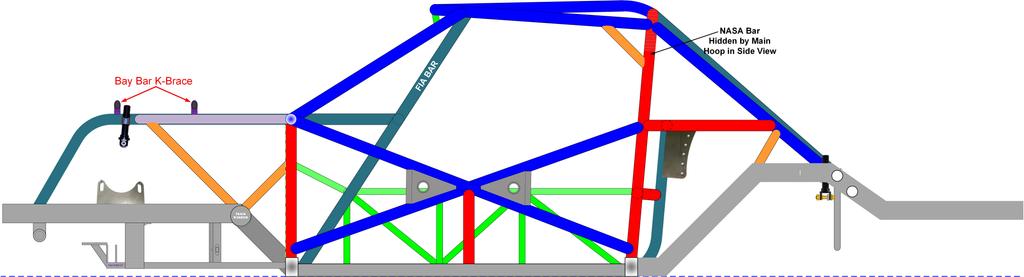
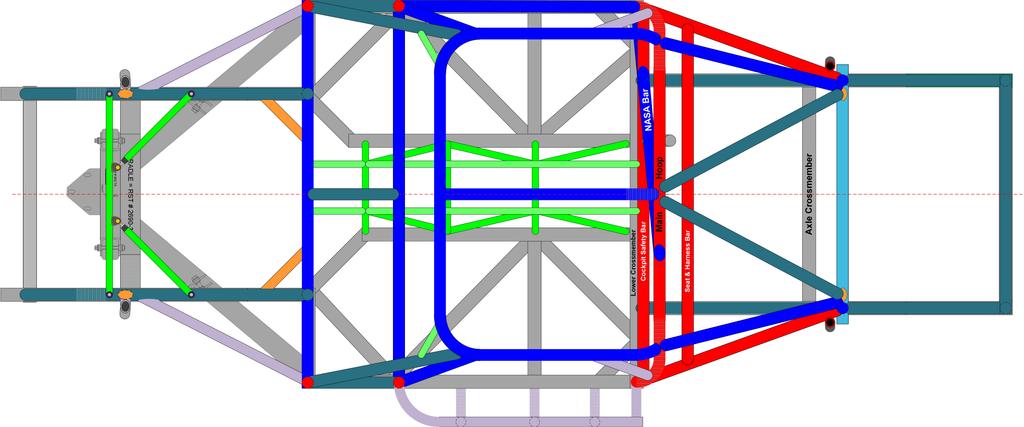
Below is my AXT-Warrior chassis. It is the lightest, least strong chassis I would drive as a Track Car. It was meant to do dual purpose as autocross & track car. Ignore the two lavender colored tubes (1 in front of & 1 behind the main hoop seat bar). Those are for forces from the decoupled torque arm, not for safety. Do pay attention to the two triangulation braces in the door bars. If you're not completing the "X", at least brace it so it doesn't fold up so easy. Then add a brace from the mid frame rails to the firewall bar. This is for safety (slows the engine being pushed back) and for chassis rigidity. We've added these bars (both sides) and seen race car pick up a half second dues to less power loss flex. Oh! You forgot the cage is just for safety? The cage needs to be rigid enough, in the right places to manage the forces. If not, your flexy flyer race car will be slower.
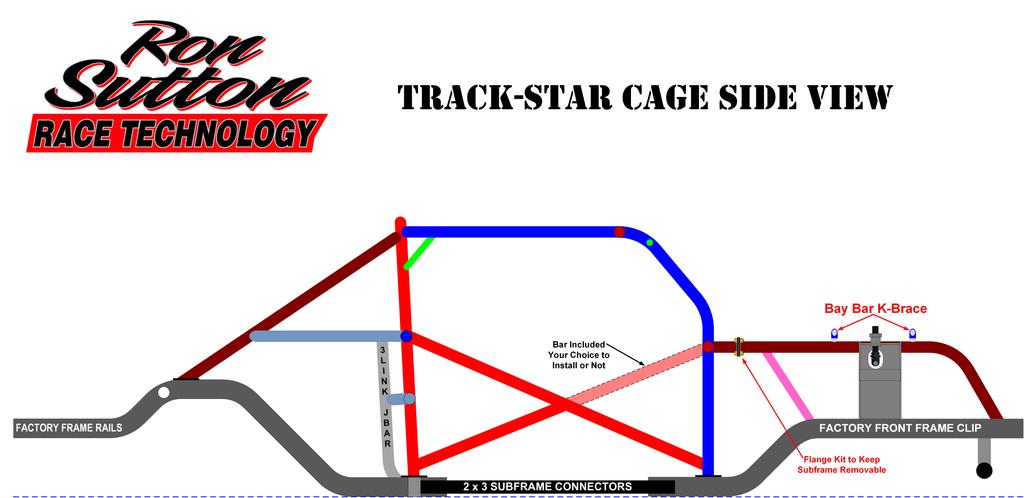
What you see below is our basic Track-Warrior chassis. The cage utilizes the full X Door bars, which really helps the braking, front grip & responsiveness of the chassis. Plus it's safer. Both the AXT-Warrior (above) & Track-Warrior (below) add a center of chassis roof bar, going from the main hoop to the front of the roof hoop. This is safety only. It reduces the possibility of the windshield bar (front of the roof hoop) from caving in on you in an upside down impact.

Here is a top view, showing that center roof bar. It also shows where we put a bend in the 1-piece X-Bar on the driver side. This is to add Driver elbow room. Adds comfort & safety. The lavender diagonal braces from the firewall bar to the engine bay bars are both safety & structural. Very critical to all of our Warrior designs.
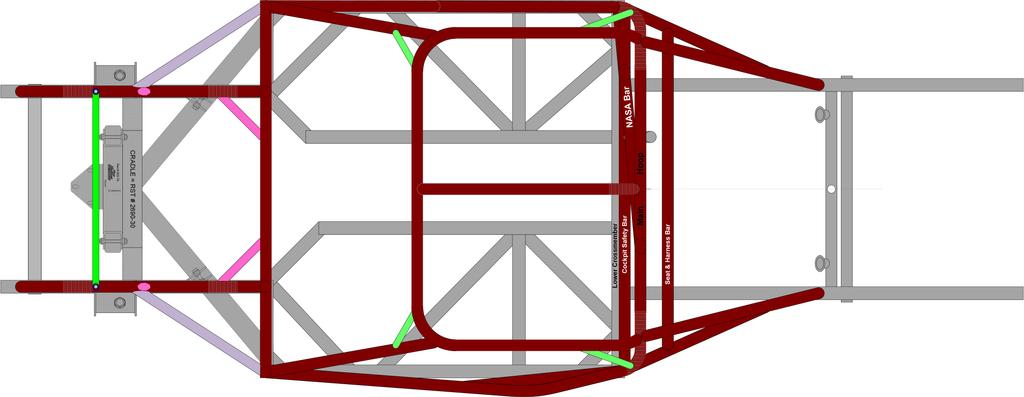
In ALL of the WARRIOR chassis cages, you'll notice four 1" round tubes (Green tubes) that tie & gusset the roof hoop to the main hoop & a-pillar bars. This are key for safety & structural performance. Don't skip them.
Also, not at the front of the car, where the coil-over shocks mount, we have a single 1" chromoly "Bay Bar". This is not safety. Pure performance. Seriously. Without this bay bar brace, the front of the clip & bay bars BOW INWARD under hard braking. That flex would cost you front grip. Adding the bay bar, keeps the grip. We step this up to a 3-piece "K-Bay Bar Brace" in faster cars. I'll show examples later on.
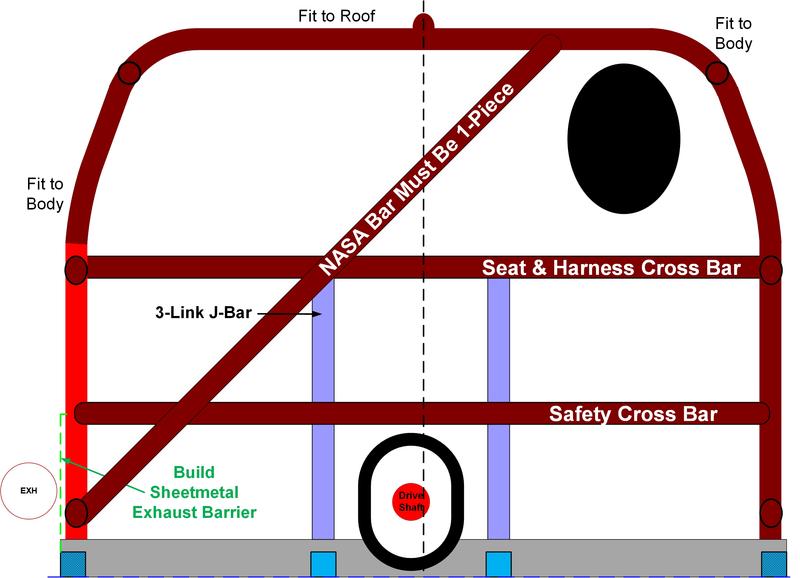
Above is our standard Warrior Main Hoop. The 1-piece NASA Bar is obvious. What may need to be pointed out is we do NOT run the NASA bar behind the driver's head & to the intersect point of the roof hoop. We run it to the main hoop, to prevent the main hoop from caving in on the driver's head. This is both legal & highly recommended.
The seat & harness bar are obvious. Height is critical. We want this bar to be within 2" of the top of the Driver's shoulders. Same with where the 1-piece X-bar in the door intersects with the seat & harness bar.
The tube below that, named the "safety bar", doubles the strength of the main hoop in side impacts ... where the driver is. We do use it to tie our 3-links into for better force management. But is primarily a safety component.
Above is out GTO/GTX Track-Warrior chassis. The teal green tube is known as the FIA bar (required by FIA). These really add some safety to the front of the roll cage roof hoop (windshield bar) from caving in. And we do see some nice structural rigidity increases as well. I recommend this FIA bar on super fast and/or heavy cars. The life you save could be your own.
Now I want to draw your attention to the 1" chromoly (neon green tubes) structure inside the car. It forms a transmission & driveline tunnel, but that's not it's purpose. It is the absolute best strengthening structure we can add to the race car, after the roll cage itself. We call it a backbone structure. It ties the rear suspension (where the forces are) to the firewall, where we're supporting the engine & trans. It is both a safety item (keeps the engine from coming into the cockpit) & a performance structure gain. We add this to all high powered track & race cars we offer.
What wasn't as obvious in the side image above, shows up clearly in the top view of the GTO/GTX Track-Warrior chassis below. That is that we're adding another cross bar between the two FIA bars. It performs a similar function as the "Safety Cross Bar" in the main hoop, adding side impact protection to the cockpit. We also use this bar to mount the steering column brackets.
Another item to see in the front, is what we call the "K-bay bar brace". This one is three pieces, forming a "K" to clear the engine & keep the bay bars from bowing in under severe g-force braking.

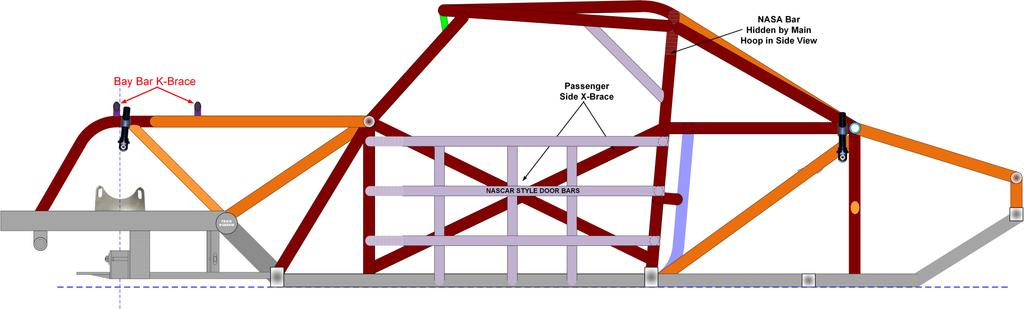
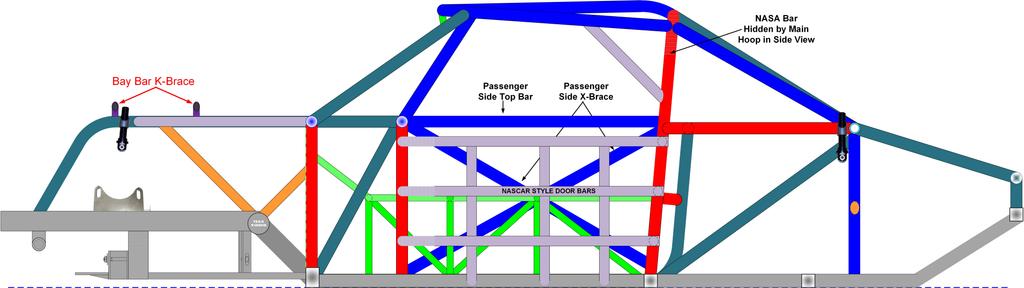
Lastly, I have three chassis images with NASCAR style door bars. The top one shows our GTA Track-Warrior chassis (stock car style for 15" wheels). Notice no FIA Bar. Second is our GN5/7 Track-Warrior chassis WITH FIA Bars & the cross bar inbetween. The top view image is also the GN5/7 Track-Warrior chassis. It is the strongest chassis we make, as it is for a "Stock Car" style body, 800HP + & 3200#+.
O. When you up your game to a well designed roll cage with 8, 10, 12 or 46 points, you just increased the safety factor by triple, and the chassis rigidity too. Again, in unibody type cars, you will want it to connect to real frame structure as much as possible. The increase in torsional rigidity ... and the performance gains make this a double win.
P. The optimum set up for safety & performance, is to make the cage out of Chromoly for the best driver & passenger protection ... and make the front & rear bars out of DOM for crush zones in the event of front or rear impacts.
To me, this (below) is the least protection you should have in a Track Car. Anything less than this is simply ridiculous.
Adding a full X in the Door bar (below) and a brace from the rear down bars to the side of the main hoop are serious safety upgrades that can save your life in serious crash.
PLEASE FEEL FREE TO COPY MY ROLL CAGE DESIGNS. I don't care about selling you a roll cage. But I do want you to live in a crash.
Adding these X-brace "Dimple Die Gussets" (below) add a lot of strength from side impacts. Frankly it prevents the center of the X from breaking or caving in as much. The dimple die gusset in the rear adds strength protecting the driver cockpit in rear impacts.
------------------------------------------------------------------------------------------
True Tube Chassis:
Q. There is a big difference between cars with a roll cage added & a designed from scratch tube chassis, if they're designed right. After 40 years of racing, building race cars & designing race cars ... I STILL look for ways to improve the safety of my tube chassis designs. I still make upgrades and changes, when I learn something new.
Ryan Newman's Daytona wreck was a good example. He had requested a change in the cage design & it was granted. At Daytona in 2020, he crashed horribly. Everyone watching thought he was dead. Myself included. But the bars he had added actually saved his own life. I made upgrades after that to include the "Ryan Newman bars" to my Warrior chassis that see upper level speeds.
All of my Warrior tube chassis are designed with 5 zones. I make the cockpit cage structure as strong as needed, to survive the forces it can see in a bad crash, without caving in on the driver. In the front, I design in two crush zones. A soft crush zone, ahead of the engine. This is designed to absorb energy in a moderate crash, protecting the driver & the engine compartment. A medium crush zone starts at the engine. So only high g-load frontal impacts will collapse this frame section, to some degree. This allows the powertrain to be shoved rearward & down, avoiding the driver.
In the rear, I also design in two crush zones. A soft crush zone, behind the fuel cell. This is designed to absorb energy in a moderate crash, protecting the driver & the fuel cell. A medium crush zone starts at the rear axle. So only high g-load rear impacts will collapse that frame section, to some degree. This allows the fuel cell to be shoved forward & down.
The area where there is no crush zone? At the doors. This is why your door bar design is so critical. In side impacts, the main hoop & the door bars are primarily what is keeping the concrete barrier or other race car out of your lap. It's no joke. I have found doubling the cross bar in the main hoop really helps add strength in a side impact. So, it's standard on all Warriors. Same with the NASA bar. It adds much needed triangulation to the main hoop.
But you still need strong door bars in-between the driver & objects outside the race car. NASCAR style bars do this best. But if you don't do that, at least build the strongest door bars possible ... and high enough to actually protect you.
Below is my AXT-Warrior chassis. It is the lightest, least strong chassis I would drive as a Track Car. It was meant to do dual purpose as autocross & track car. Ignore the two lavender colored tubes (1 in front of & 1 behind the main hoop seat bar). Those are for forces from the decoupled torque arm, not for safety. Do pay attention to the two triangulation braces in the door bars. If you're not completing the "X", at least brace it so it doesn't fold up so easy. Then add a brace from the mid frame rails to the firewall bar. This is for safety (slows the engine being pushed back) and for chassis rigidity. We've added these bars (both sides) and seen race car pick up a half second dues to less power loss flex. Oh! You forgot the cage is just for safety? The cage needs to be rigid enough, in the right places to manage the forces. If not, your flexy flyer race car will be slower.
What you see below is our basic Track-Warrior chassis. The cage utilizes the full X Door bars, which really helps the braking, front grip & responsiveness of the chassis. Plus it's safer. Both the AXT-Warrior (above) & Track-Warrior (below) add a center of chassis roof bar, going from the main hoop to the front of the roof hoop. This is safety only. It reduces the possibility of the windshield bar (front of the roof hoop) from caving in on you in an upside down impact.
Here is a top view, showing that center roof bar. It also shows where we put a bend in the 1-piece X-Bar on the driver side. This is to add Driver elbow room. Adds comfort & safety. The lavender diagonal braces from the firewall bar to the engine bay bars are both safety & structural. Very critical to all of our Warrior designs.
In ALL of the WARRIOR chassis cages, you'll notice four 1" round tubes (Green tubes) that tie & gusset the roof hoop to the main hoop & a-pillar bars. This are key for safety & structural performance. Don't skip them.
Also, not at the front of the car, where the coil-over shocks mount, we have a single 1" chromoly "Bay Bar". This is not safety. Pure performance. Seriously. Without this bay bar brace, the front of the clip & bay bars BOW INWARD under hard braking. That flex would cost you front grip. Adding the bay bar, keeps the grip. We step this up to a 3-piece "K-Bay Bar Brace" in faster cars. I'll show examples later on.
Above is our standard Warrior Main Hoop. The 1-piece NASA Bar is obvious. What may need to be pointed out is we do NOT run the NASA bar behind the driver's head & to the intersect point of the roof hoop. We run it to the main hoop, to prevent the main hoop from caving in on the driver's head. This is both legal & highly recommended.
The seat & harness bar are obvious. Height is critical. We want this bar to be within 2" of the top of the Driver's shoulders. Same with where the 1-piece X-bar in the door intersects with the seat & harness bar.
The tube below that, named the "safety bar", doubles the strength of the main hoop in side impacts ... where the driver is. We do use it to tie our 3-links into for better force management. But is primarily a safety component.
Above is out GTO/GTX Track-Warrior chassis. The teal green tube is known as the FIA bar (required by FIA). These really add some safety to the front of the roll cage roof hoop (windshield bar) from caving in. And we do see some nice structural rigidity increases as well. I recommend this FIA bar on super fast and/or heavy cars. The life you save could be your own.
Now I want to draw your attention to the 1" chromoly (neon green tubes) structure inside the car. It forms a transmission & driveline tunnel, but that's not it's purpose. It is the absolute best strengthening structure we can add to the race car, after the roll cage itself. We call it a backbone structure. It ties the rear suspension (where the forces are) to the firewall, where we're supporting the engine & trans. It is both a safety item (keeps the engine from coming into the cockpit) & a performance structure gain. We add this to all high powered track & race cars we offer.
What wasn't as obvious in the side image above, shows up clearly in the top view of the GTO/GTX Track-Warrior chassis below. That is that we're adding another cross bar between the two FIA bars. It performs a similar function as the "Safety Cross Bar" in the main hoop, adding side impact protection to the cockpit. We also use this bar to mount the steering column brackets.
Another item to see in the front, is what we call the "K-bay bar brace". This one is three pieces, forming a "K" to clear the engine & keep the bay bars from bowing in under severe g-force braking.
Lastly, I have three chassis images with NASCAR style door bars. The top one shows our GTA Track-Warrior chassis (stock car style for 15" wheels). Notice no FIA Bar. Second is our GN5/7 Track-Warrior chassis WITH FIA Bars & the cross bar inbetween. The top view image is also the GN5/7 Track-Warrior chassis. It is the strongest chassis we make, as it is for a "Stock Car" style body, 800HP + & 3200#+.
#26
Designing In Safety for Track & Racing / Re: Building Track & Race Cars...
Last post by Ron Sutton - Apr 23, 2026, 11:41 AMCRASH PROTECTION
Roll Bars, Door Bars & Cages for REAL Safety
I have a long background in chassis building & a lot of real world crash experience where people lived & died. Since losing a friend in a crash and almost losing another in a crash in the 80's ... I have studied, worked toward & developed safer race cars. Most of my knowledge is from having seen many race cars wreck ... and studied the old design failures. We would implement new designs ... and eventually see them wreck too ... and see if what we did proved safer. Of course, as a professional race car designer, I've learned from professional race teams and safety engineers, as well. All of my Warrior tube chassis cars have five zones. A safety cage plus two crush zones in front & two crush zones in the rear. More on this later.
I do not consider myself to be the "ultimate safety authority" ... but I have a lot of real world crash experience. In my driver development program, we lived, breathed, taught, practiced & required safety. If one of those young drivers had been disabled or died on my watch, I don't think I could live with myself. I required HANS devices & full containment seats BEFORE the racing sanctioning bodies did.
My young drivers personally committed they would protect themselves, as a promise to me. One driver showed up at the track without his fire retardant underwear. No fire retardant underwear ... no driving my race cars. "Aw Ron, but it's just practice. I'll have it on tomorrow for the race." Not no ... but hell no. He ran & bought some Carbon-X underwear & made the last half of practice.
I have lost friends because they were "just". They were just practicing, just playing around, just testing. Cars, guard rails, cliffs & concrete barriers don't know you're just playing, just practicing, just testing, etc. A drag racing friend died in 1985 doing a private test. He had his helmet & 5-point harness on ... but not fully tight ... because they were just testing. But when a car flips & crashes ... the forces don't know you were you "Just ..."
I had a young driver, hit the concrete wall on a practice day at a ½ mile track when I wasn't there. He was hurt & bruised bad, but otherwise ok. Some of the injuries suggested he wasn't wearing his HANS. I later found out he wasn't ... and I dropped him from my program. He broke his promise to me to be smart & protect himself in this dangerous sport.
I've been on fire, been upside down at 177 mph, hit walls so hard I'm lucky to be alive & broke my back in 1991 ... almost didn't walk again. This stuff is serious. If you're going to build your track car to be more like a race car ... and drive it in race situations ... then plan for race level safety measures. The sport of Pro-Touring ... where drivers compete on real road courses & fast events like Optima, the Silver State Challenge, etc ... are just asking for someone to get killed or disabled ... because there are less rules.
Don't let the lack of rules guide your safety
-----------------------------------------------------------------------------------------------------------
In my drag race chassis building business, we had a funny ... but true ... phrase we lived by. We built our race cars to win races ... and protect the driver. We called our additional safety procedures "our client retention program" ... and with a bit of tongue-in-cheek-humor, we would tell prospective clients, "if you crash one of our race cars & live ... you may buy another one. But if you crash & die ... you won't be buying anymore race cars."
We built our cars with methods that took more time & money, but protected the driver. We didn't allow the customer to choose parts if they affected safety. All of this safety was "built into the cost" and wasn't "optional" to the customer. If they didn't want to spend the money for our level of car & safety, they weren't our kind of customer.
Don't want anyone dying on my watch ... and I have seen too many people die ... including a prospective customer who went somewhere else because we wouldn't use his homemade fuel
cell. Another chassis builder did build a car with it. The fire didn't kill him ... when he went through the guard rail at Green Valley Raceway in Ft Worth, Texas. The fuel cell ruptured & broke free, allowing fuel to go forward in the cockpit. He died 4 days later in the hospital from pneumonia ... which I learned is common with severe burn victims.
-----------------------------------------------------------------------------------------------------------
Alright, I'll get off my soapbox and share some safety details ...
Roll Bars
A. A 4-point roll bar with plates bolted to or welded to thin sheet metal in unibody type cars ... adds a very small level of protection. I believe more to satisfy race event insurance companies than to protect the driver. Car owners add them thinking they are getting a degree of safety that really doesn't exist ... and then have a false sense of security when driving in races, or race like conditions.
B. A 4-point roll bar that mounts to actual frame structure, does offers a higher degree of crush protection in the event of a roll over or impact to the roof.
C. The more footprint points the roll bar or cage has, and the bigger, the stronger it will be. The more of these points that actually connect to frame structure, the stronger it will be.
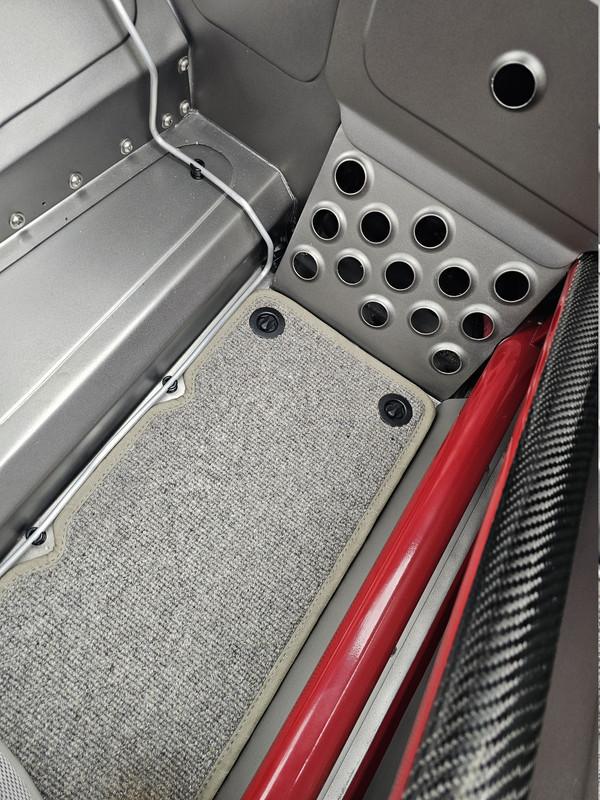
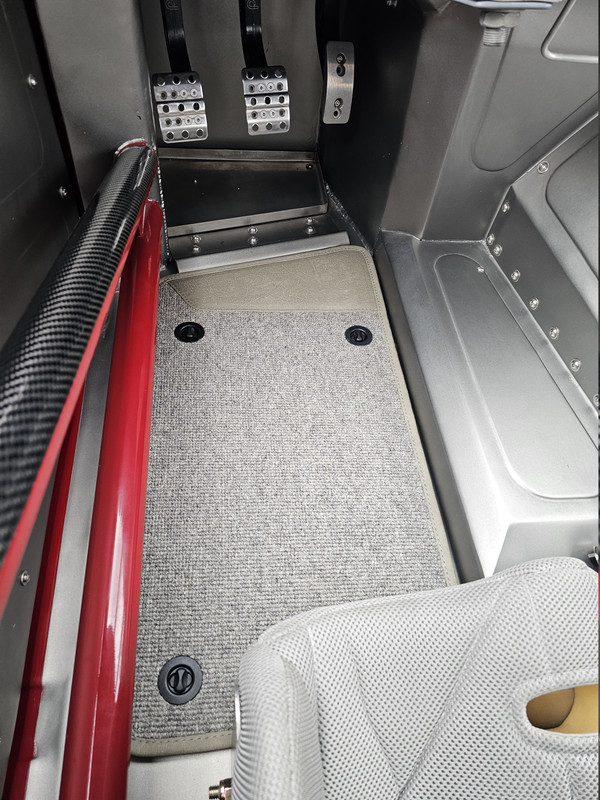
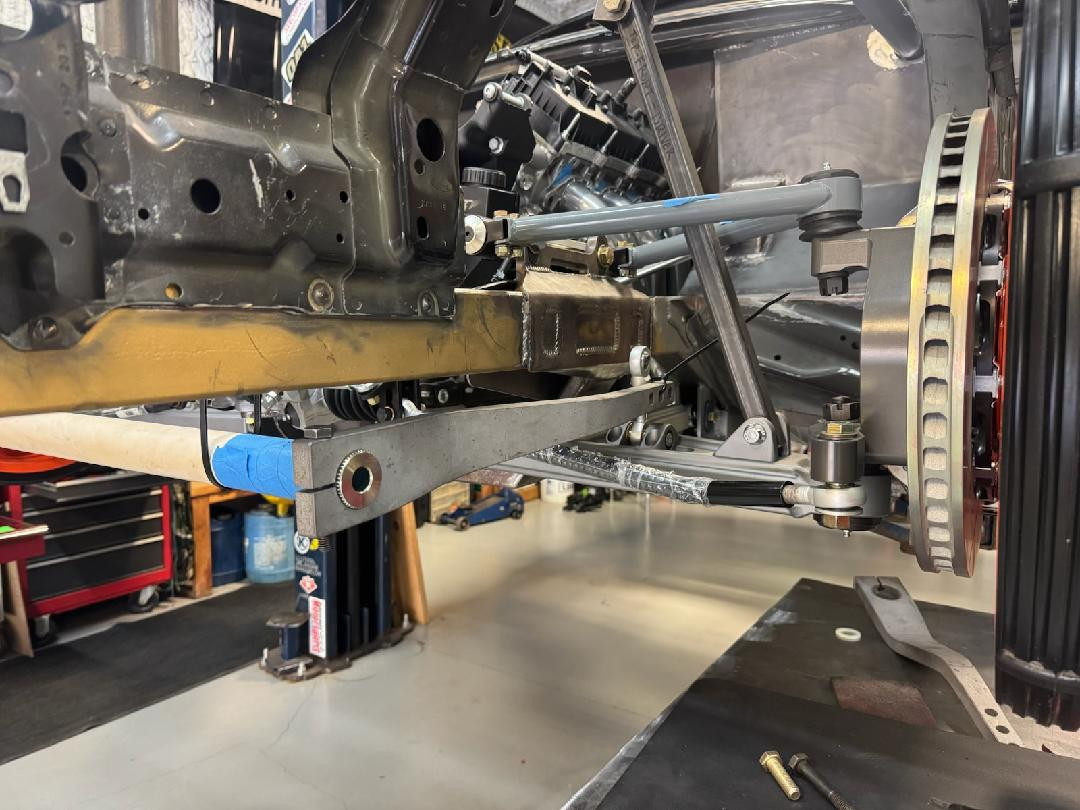
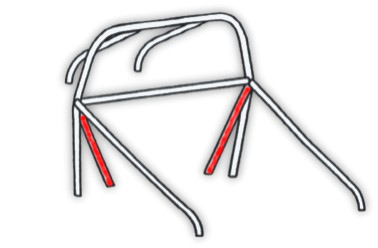
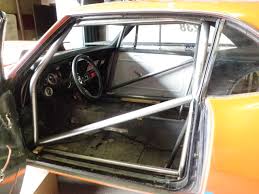
D. A 4-point roll bar with 2 extra struts that connect the main hoop to the subframe connectors in unibody type cars, makes a difference. The frame connectors, when welded in, add a degree of stiffness. And when the roll bar utilizes braces from the main hoop ... under the cross bar ... attached to frame connectors ... the roll bar is much better prepared to withstand roof impacts ... than compared to just welding plates to the sheet metal. Look at the red bars in the photo.
E. A 4-point roll bar with 2 extra connector struts ... with the 2 rear bars attaching to real rear subframe ... is significantly better.
F. A 4-point roll bar with 2 extra connector struts ... with the 2 rear bars attaching to real rear subframe ... in an X-brace fashion ... is substantially better.
G. Building a 6-point roll bar with 4 rearward bars ... 2 straight & 2 in an X-brace ... both attaching to real frame ... is as good as you can build without adding door bars or a cage. There are various designs. I think some are safer than others.
H. For Pete's sake ... in "Street Legal" race cars or track cars ... don't install a roll bar so close to the driver's or passenger's head ... that they hit it in an impact ... UNLESS you are ALWAYS going to wear a helmet ... including on the street. Guys have died from moderate wrecks on city streets, when their unprotected head hit the roll bar and split their head open. In those type of typical auto wrecks, they would have been better off to have no roll bar. Please don't use this as an excuse to not have one. Just install it with this in mind.
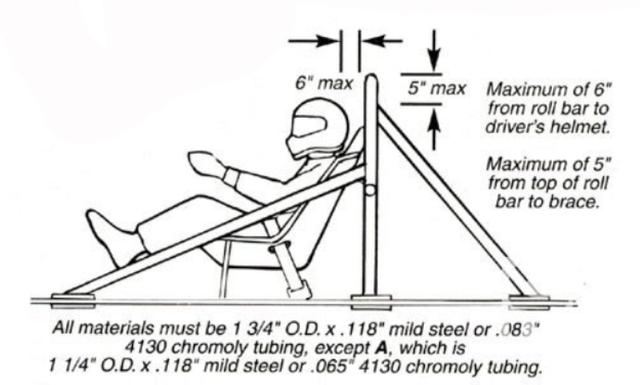
NHRA requires the roll bar to be within 6" of the driver's helmet. A good rule of thumb for street driven track cars is make sure the roll bar is 5" from the primary driver's head with no helmet on, which should work out to 4" from the driver's head with a helmet on. Most 5-point harnesses ... if cinched really tight (as in uncomfortable at first) ... allow about 2" of driver movement in hard wrecks. (I know from in-car video.) 4"-5" distance between human heads and steel tubing "should" keep the driver & passenger's heads from hitting the roll bar, yet still be close enough for the roll bar to provide driver protection in a roll over.
It is CRITICAL to weld the cage bars, or braces, to actual frame material, NOT just the sheetmetal floor. This photo shows red braces run from the main hoop to the subframe connectors.
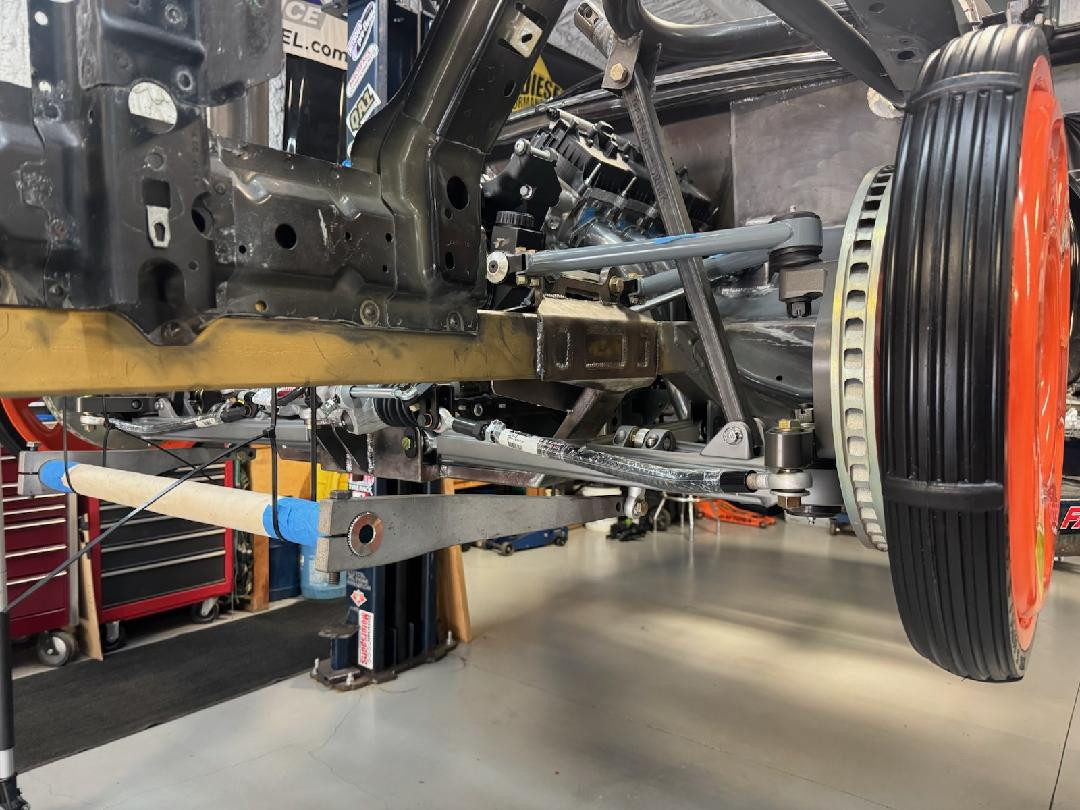
OR, THIS CAN HAPPEN! Look closely.
Door Bars:
I. Door bars are one the best additions you can add to a roll bar for safety & performance ... as long as you don't mount them too low. It supports the roll bar from "folding" in the middle of the main hoop ... with the added bonus of strengthening the chassis for improved performance.
Running door bars at the correct height raises the level of safety while improving the torsional rigidity of the chassis quite a bit. It is probably the second best chassis reinforcement you can do ... and pound for pound ... the best chassis stiffener for the least added weight.
J. An added bonus, if you didn't mount them so low they're worthless, door bars add major protection in side impacts. You don't plan on or expect a side impact. But they happen on road courses around the world way more than you'll know. Sometimes the car is sideways & hits a barrier or another car. Other times another car on track hits you in the door. There isn't any "crush zone" there. The door bars & main hoop is all that will protect you.
Similar for street driven track cars. When someone runs a red light & crashes into your door, or the passenger door where your loved ones ride. On the track, door bars ... properly placed ... prevent things from coming through the door and killing you.
Ten door bar tips:
1. They typically connect to the main hoop at the bend, in line with the bar behind the seats. But this is just a starting point.
2. Ideally, you want to run the lower mount as far forward as you can, to create a wide "trusslike" footprint.
3. After you mock up some plastic sprinkler pipe at these two points ... we need to see if we run into "packaging problems."
4. We want to make SURE the door bars don't interfere with your ability to steer the hot rod. Because seat height, door bar height & driver height all play a role. I never know exactly where to mount door bars until I mock them up with the driver in the seat.
5. Often times, the bar is too close into the driver's seat (passenger too) and putting a bend in the door bar, with the curve "out" ... provides more driver cockpit room.
6. At the other end, we simply need to make sure it doesn't interfere with your feet or pedals.
7. Don't put a downward bend in it if you can avoid it ... unless you triangulate it. Especially in a track car. The improved strength & safety of having the bar at the right height outweighs the inconvenience of climbing over the bar. The door bar being lower doesn't offer as much side impact protection in a crash. I say "often", because it all depends on the height of the bar versus the people in the seats. Ultimately, for safety, you want the door bar to prevent things ... cars, telephone poles, ends of concrete barriers, etc ... from coming in & hitting the driver or passenger in side impacts.
8. I like to use 4130 Chromoly for door bars, regardless of what the main hoop is made of. Chromoly welds to mild steel just fine & the increased driver & passenger protection is worth the small difference in tubing cost.
9. I typically use the same size of tubing for the door bars as the main hoop ... 1-3/4" or 1-5/8". An exception would be if we need to go down 1/8 or 1/4" for clearance purposes. If you use 1-3/4" or 1-5/8" diameter Chromoly ... .095" wall is good. If you drop down to 1-1/2" diameter ... bump the wall thickness to .120"
10. Stock Car style door bars with uprights & 1/8" plate are safest & X-braces work well too, but both require people to "crawl in" through the window sized opening. For single down bar with braces, I prefer the structure & placement in this photo.
------------------------------------------------------------------------------------------
Material Matters:
K. Most roll bars & cages are made with less expensive seam welded mild steel. Mild steel grades commonly vary from 1010 to 1030. The higher the number, the stronger it is. Most seam welded tubing commonly available is 1010 or 1012, the cheapest with the least strength. But 1018 is available, for slightly more money, if you look for it. When buying a roll bar ... ask the manufacturer what they use. I am NOT a fan of seam welded tubing for roll cages. But it's better than not having one.
L. DOM stands for drawn over mandrel. It is a better process for manufacturing round tubing, working with the grain of the steel & leaving no weak seam. It is still mild steel ... but because the process costs more, manufacturers use higher grades ... typically 1018 to 1026. Most stock car cages are made from this. A small percentage are made with chromoly. Because of the constant crashes & repairs in oval track racing, stock car racers & chassis builders like that the mild steel DOM bends easily creating localized crush zones. Personally, I don't want a roll bar over my head to act as a crush zone.
M. Stainless steel tubing is similar in strength to high grade DOM mild steel. In racing, we use it on bumpers & nerf bars that we WANT to bend on impact. We use stainless, instead of DOM, only so we don't need to paint it or chrome it. We tig weld it & bolt it on.
N. 4130 Chromoly is the strongest option of commonly available & affordable tubing materials. OMG! Chromoly is SO MUCH STRONGER than mild steel, DOM or stainless steel ... it's hard to compare them. NHRA understands this & requires mild steel bars to be 1-3/4" x .134" wall or 4130 Chromoly at 1-5/8" x .083" wall ... and the Chromoly is STILL STRONGER. All pro level drag cars are made from Chromoly for this reason. Chromoly is so strong, that often when a car wrecks, instead of crushing, it spreads the load over the whole car ... and therefore the entire chassis "bows."
If I were installing a 4 or 6 point roll bar without door bars ... or a 4, 6 or 8 point roll bar with door bars ... but not a "roll cage" ... I would use 1-3/4" x .095" 4130 Chromoly for ultimate strength ... and mount to as many frame structure points as I could.

Roll Bars, Door Bars & Cages for REAL Safety
I have a long background in chassis building & a lot of real world crash experience where people lived & died. Since losing a friend in a crash and almost losing another in a crash in the 80's ... I have studied, worked toward & developed safer race cars. Most of my knowledge is from having seen many race cars wreck ... and studied the old design failures. We would implement new designs ... and eventually see them wreck too ... and see if what we did proved safer. Of course, as a professional race car designer, I've learned from professional race teams and safety engineers, as well. All of my Warrior tube chassis cars have five zones. A safety cage plus two crush zones in front & two crush zones in the rear. More on this later.
I do not consider myself to be the "ultimate safety authority" ... but I have a lot of real world crash experience. In my driver development program, we lived, breathed, taught, practiced & required safety. If one of those young drivers had been disabled or died on my watch, I don't think I could live with myself. I required HANS devices & full containment seats BEFORE the racing sanctioning bodies did.
My young drivers personally committed they would protect themselves, as a promise to me. One driver showed up at the track without his fire retardant underwear. No fire retardant underwear ... no driving my race cars. "Aw Ron, but it's just practice. I'll have it on tomorrow for the race." Not no ... but hell no. He ran & bought some Carbon-X underwear & made the last half of practice.
I have lost friends because they were "just". They were just practicing, just playing around, just testing. Cars, guard rails, cliffs & concrete barriers don't know you're just playing, just practicing, just testing, etc. A drag racing friend died in 1985 doing a private test. He had his helmet & 5-point harness on ... but not fully tight ... because they were just testing. But when a car flips & crashes ... the forces don't know you were you "Just ..."
I had a young driver, hit the concrete wall on a practice day at a ½ mile track when I wasn't there. He was hurt & bruised bad, but otherwise ok. Some of the injuries suggested he wasn't wearing his HANS. I later found out he wasn't ... and I dropped him from my program. He broke his promise to me to be smart & protect himself in this dangerous sport.
I've been on fire, been upside down at 177 mph, hit walls so hard I'm lucky to be alive & broke my back in 1991 ... almost didn't walk again. This stuff is serious. If you're going to build your track car to be more like a race car ... and drive it in race situations ... then plan for race level safety measures. The sport of Pro-Touring ... where drivers compete on real road courses & fast events like Optima, the Silver State Challenge, etc ... are just asking for someone to get killed or disabled ... because there are less rules.
Don't let the lack of rules guide your safety
-----------------------------------------------------------------------------------------------------------
In my drag race chassis building business, we had a funny ... but true ... phrase we lived by. We built our race cars to win races ... and protect the driver. We called our additional safety procedures "our client retention program" ... and with a bit of tongue-in-cheek-humor, we would tell prospective clients, "if you crash one of our race cars & live ... you may buy another one. But if you crash & die ... you won't be buying anymore race cars."
We built our cars with methods that took more time & money, but protected the driver. We didn't allow the customer to choose parts if they affected safety. All of this safety was "built into the cost" and wasn't "optional" to the customer. If they didn't want to spend the money for our level of car & safety, they weren't our kind of customer.
Don't want anyone dying on my watch ... and I have seen too many people die ... including a prospective customer who went somewhere else because we wouldn't use his homemade fuel
cell. Another chassis builder did build a car with it. The fire didn't kill him ... when he went through the guard rail at Green Valley Raceway in Ft Worth, Texas. The fuel cell ruptured & broke free, allowing fuel to go forward in the cockpit. He died 4 days later in the hospital from pneumonia ... which I learned is common with severe burn victims.
-----------------------------------------------------------------------------------------------------------
Alright, I'll get off my soapbox and share some safety details ...
Roll Bars
A. A 4-point roll bar with plates bolted to or welded to thin sheet metal in unibody type cars ... adds a very small level of protection. I believe more to satisfy race event insurance companies than to protect the driver. Car owners add them thinking they are getting a degree of safety that really doesn't exist ... and then have a false sense of security when driving in races, or race like conditions.
B. A 4-point roll bar that mounts to actual frame structure, does offers a higher degree of crush protection in the event of a roll over or impact to the roof.
C. The more footprint points the roll bar or cage has, and the bigger, the stronger it will be. The more of these points that actually connect to frame structure, the stronger it will be.
D. A 4-point roll bar with 2 extra struts that connect the main hoop to the subframe connectors in unibody type cars, makes a difference. The frame connectors, when welded in, add a degree of stiffness. And when the roll bar utilizes braces from the main hoop ... under the cross bar ... attached to frame connectors ... the roll bar is much better prepared to withstand roof impacts ... than compared to just welding plates to the sheet metal. Look at the red bars in the photo.
E. A 4-point roll bar with 2 extra connector struts ... with the 2 rear bars attaching to real rear subframe ... is significantly better.
F. A 4-point roll bar with 2 extra connector struts ... with the 2 rear bars attaching to real rear subframe ... in an X-brace fashion ... is substantially better.
G. Building a 6-point roll bar with 4 rearward bars ... 2 straight & 2 in an X-brace ... both attaching to real frame ... is as good as you can build without adding door bars or a cage. There are various designs. I think some are safer than others.
H. For Pete's sake ... in "Street Legal" race cars or track cars ... don't install a roll bar so close to the driver's or passenger's head ... that they hit it in an impact ... UNLESS you are ALWAYS going to wear a helmet ... including on the street. Guys have died from moderate wrecks on city streets, when their unprotected head hit the roll bar and split their head open. In those type of typical auto wrecks, they would have been better off to have no roll bar. Please don't use this as an excuse to not have one. Just install it with this in mind.
NHRA requires the roll bar to be within 6" of the driver's helmet. A good rule of thumb for street driven track cars is make sure the roll bar is 5" from the primary driver's head with no helmet on, which should work out to 4" from the driver's head with a helmet on. Most 5-point harnesses ... if cinched really tight (as in uncomfortable at first) ... allow about 2" of driver movement in hard wrecks. (I know from in-car video.) 4"-5" distance between human heads and steel tubing "should" keep the driver & passenger's heads from hitting the roll bar, yet still be close enough for the roll bar to provide driver protection in a roll over.
It is CRITICAL to weld the cage bars, or braces, to actual frame material, NOT just the sheetmetal floor. This photo shows red braces run from the main hoop to the subframe connectors.
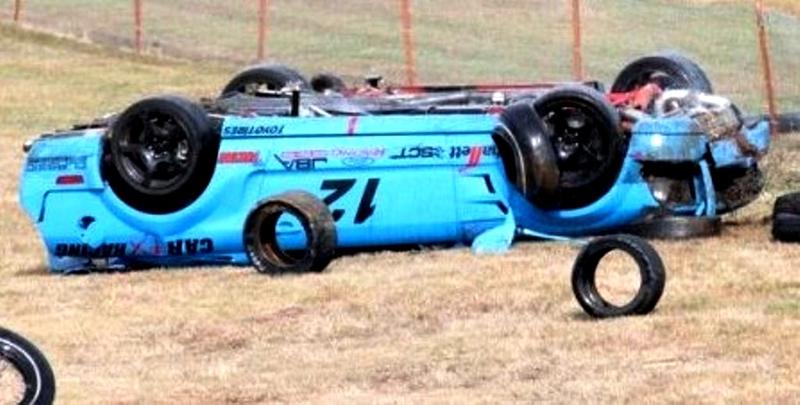
OR, THIS CAN HAPPEN! Look closely.
Door Bars:
I. Door bars are one the best additions you can add to a roll bar for safety & performance ... as long as you don't mount them too low. It supports the roll bar from "folding" in the middle of the main hoop ... with the added bonus of strengthening the chassis for improved performance.
Running door bars at the correct height raises the level of safety while improving the torsional rigidity of the chassis quite a bit. It is probably the second best chassis reinforcement you can do ... and pound for pound ... the best chassis stiffener for the least added weight.
J. An added bonus, if you didn't mount them so low they're worthless, door bars add major protection in side impacts. You don't plan on or expect a side impact. But they happen on road courses around the world way more than you'll know. Sometimes the car is sideways & hits a barrier or another car. Other times another car on track hits you in the door. There isn't any "crush zone" there. The door bars & main hoop is all that will protect you.
Similar for street driven track cars. When someone runs a red light & crashes into your door, or the passenger door where your loved ones ride. On the track, door bars ... properly placed ... prevent things from coming through the door and killing you.
Ten door bar tips:
1. They typically connect to the main hoop at the bend, in line with the bar behind the seats. But this is just a starting point.
2. Ideally, you want to run the lower mount as far forward as you can, to create a wide "trusslike" footprint.
3. After you mock up some plastic sprinkler pipe at these two points ... we need to see if we run into "packaging problems."
4. We want to make SURE the door bars don't interfere with your ability to steer the hot rod. Because seat height, door bar height & driver height all play a role. I never know exactly where to mount door bars until I mock them up with the driver in the seat.
5. Often times, the bar is too close into the driver's seat (passenger too) and putting a bend in the door bar, with the curve "out" ... provides more driver cockpit room.
6. At the other end, we simply need to make sure it doesn't interfere with your feet or pedals.
7. Don't put a downward bend in it if you can avoid it ... unless you triangulate it. Especially in a track car. The improved strength & safety of having the bar at the right height outweighs the inconvenience of climbing over the bar. The door bar being lower doesn't offer as much side impact protection in a crash. I say "often", because it all depends on the height of the bar versus the people in the seats. Ultimately, for safety, you want the door bar to prevent things ... cars, telephone poles, ends of concrete barriers, etc ... from coming in & hitting the driver or passenger in side impacts.
8. I like to use 4130 Chromoly for door bars, regardless of what the main hoop is made of. Chromoly welds to mild steel just fine & the increased driver & passenger protection is worth the small difference in tubing cost.
9. I typically use the same size of tubing for the door bars as the main hoop ... 1-3/4" or 1-5/8". An exception would be if we need to go down 1/8 or 1/4" for clearance purposes. If you use 1-3/4" or 1-5/8" diameter Chromoly ... .095" wall is good. If you drop down to 1-1/2" diameter ... bump the wall thickness to .120"
10. Stock Car style door bars with uprights & 1/8" plate are safest & X-braces work well too, but both require people to "crawl in" through the window sized opening. For single down bar with braces, I prefer the structure & placement in this photo.
------------------------------------------------------------------------------------------
Material Matters:
K. Most roll bars & cages are made with less expensive seam welded mild steel. Mild steel grades commonly vary from 1010 to 1030. The higher the number, the stronger it is. Most seam welded tubing commonly available is 1010 or 1012, the cheapest with the least strength. But 1018 is available, for slightly more money, if you look for it. When buying a roll bar ... ask the manufacturer what they use. I am NOT a fan of seam welded tubing for roll cages. But it's better than not having one.
L. DOM stands for drawn over mandrel. It is a better process for manufacturing round tubing, working with the grain of the steel & leaving no weak seam. It is still mild steel ... but because the process costs more, manufacturers use higher grades ... typically 1018 to 1026. Most stock car cages are made from this. A small percentage are made with chromoly. Because of the constant crashes & repairs in oval track racing, stock car racers & chassis builders like that the mild steel DOM bends easily creating localized crush zones. Personally, I don't want a roll bar over my head to act as a crush zone.
M. Stainless steel tubing is similar in strength to high grade DOM mild steel. In racing, we use it on bumpers & nerf bars that we WANT to bend on impact. We use stainless, instead of DOM, only so we don't need to paint it or chrome it. We tig weld it & bolt it on.
N. 4130 Chromoly is the strongest option of commonly available & affordable tubing materials. OMG! Chromoly is SO MUCH STRONGER than mild steel, DOM or stainless steel ... it's hard to compare them. NHRA understands this & requires mild steel bars to be 1-3/4" x .134" wall or 4130 Chromoly at 1-5/8" x .083" wall ... and the Chromoly is STILL STRONGER. All pro level drag cars are made from Chromoly for this reason. Chromoly is so strong, that often when a car wrecks, instead of crushing, it spreads the load over the whole car ... and therefore the entire chassis "bows."
If I were installing a 4 or 6 point roll bar without door bars ... or a 4, 6 or 8 point roll bar with door bars ... but not a "roll cage" ... I would use 1-3/4" x .095" 4130 Chromoly for ultimate strength ... and mount to as many frame structure points as I could.
#27
Designing In Safety for Track & Racing / Building Track & Race Cars for...
Last post by Ron Sutton - Apr 23, 2026, 11:13 AMLet's talk Building Track & Race Cars for Safety!
Welcome,
The foundation for this safety forum is based on my experience & opinion. I get on my soap box because I'm passionate about safety. No extra charge for the soap box.
I am normally a pretty positive & happy guy. But this thread brings out a lot of memories for me of people getting seriously injured or killed needlessly. So, this topic brings out my dark side. I am pretty passionate about safety, because there is no good reason not to be as safe as we can be.
When I drove race cars I was one of the most aggressive drivers you could imagine. When I developed drivers, we were hardcore serious about getting to the front & winning races. I teach drivers how to drive at the very edge of the car's limit ... the tire's limit and their limit ... and frankly to push & find new limits. That is easier to do the driver is confident ... because every safety precaution has been taken ... and stupid to even be on the race track if every precaution hasn't been taken.
I do not want to offend anyone or come off as a know it all. I do not consider myself to be the "ultimate safety authority" ... but I have a lot of real world crash experience & want to share what I learned. I am passionate about building safe road race & track cars and protecting the driver. Please do not take anything I say as condescending. I just want to see people get informed & make smart decisions.
I won't tell anyone "you have to do this" ... but I can tell you what I suggest ... and I'll happily offer advice in the areas I have experience. I respect everyone's right to their own opinions and their own decisions. It's your hot rod and your life. Well ... it's also the life of people around you. I'll share what I have learned and believe ... and you can decide what makes sense for you.
I believe in taking personal responsibility as much as is possible & reasonable. When I drive a car ... any car ... I take personal responsibility for my safety ... and the safety of my passengers ... and the safety of the cars & people around me. It doesn't matter who built the car or who worked on the car. It doesn't matter who caused the crash at 1xx mph ... I am responsible for my safety and my passengers. Anything less is irresponsible. That is my belief.
I am not naïve enough to think everyone has the same belief. Nor am I trying to "convert" anyone's beliefs. I've simply seen too many people get serious hurt & paralyzed ... and too many people die ... in race track accidents. These have shaped my beliefs.
Others do not embrace that belief. Some people may believe if someone built their car ... and it breaks & they are paralyzed or die ... someone else is responsible. Of if someone else makes a mistake and crashes them ... and people die ... someone else is responsible. Old Uncle Si from Duck Dynasty would surely say, "But you're still dead ... Jack!" Others want to pretend it won't happen to them. Or they won't drive hard enough, or often enough, for bad things to happen. This is especially true with Track Day Drivers. I believe those guys are kidding themselves & playing Russian Roulette with their lives.
My hope & goal with this forum thread is to provide knowledge to the guys & gals that also believe they need to take responsibility for their safety ... and of the others around them.
I believe if we're going to play with race car level power & handling ... and race level speeds ... we need race car level safety. If we're going to build Professional Race Car level power & handling ... and Professional Race Car level speeds ... we need Professional Race Car level safety. I think it's cool a lot of guys build their old Muscle cars into Track Cars to beat the modern Corvettes, other Supercars & even Race Cars. But those cars have a tremendous level of safety designed in them. I believe we need Supercar or Professional Race Car safety too. It may not be feasible to add airbags, but there are plenty of things we can do to improve safety in our 1950-1980's Muscle Car based Track Cars.
In my 40+ years of racing, I've seen a lot of cars wreck because of part failure. I take car safety decisions ... and precaution from proper maintenance & car preparation .... just as seriously as driver safety gear. Many guys don't and blame "bad luck." It's usually not.
These are more fun to say ... when spoken like you're listening to Jeff Foxworthy say ... you might be a redneck.
• If a cheap rod end fails causing suspension failure ... and you crash ... that's not bad luck.
• If an old bolt breaks because it was cycled too much, causing suspension failure ... and you crash ... that's not bad luck.
• If a bearing designed to handle forces from a G70-14 tire ... fails with big, grippy tires & you crash ... that's not bad luck.
• If you lose your brakes because they weren't designed for track abuse ... and you crash ... that's not bad luck.
• If an inferior ball joint breaks causing suspension failure ... and steering loss & you crash ... that's not bad luck.
• If a suspension bracket cracks at the weld & goes un-inspected ... then breaks & you crash ... that's not bad luck.
• If the engine is worn out, or built shabbily, and blows up ... putting oil under the tires & you crash ... that's not bad luck.
• If the transmission is worn out, or built shabbily, and blows up ... putting oil under the tires & you crash ... that's not bad luck.
• If the rear end is worn out, or built shabbily, breaks & locks up ... backing you into the wall ... that's not bad luck.
There are typically six causes of wrecks:
1. Part failure ... tire, bearing, brakes, steering, suspension, engine, etc ... doesn't matter what.
2. Driver mistake/human error.
3. Driver pushed & drove past limits of set-up, grip, etc. (Not the same as human error, as you intended to push the limits)
4. Someone hits you from the side or behind.
5. You hit another car because you couldn't avoid their chaos.
6. You hit something else ... avoiding their chaos.
When you read this ... I hope you realize you are not in control of everything that happens on track. Simply driving at 9/10's "to be safe" is not insurance against 1, 2, 4, 5 or 6. You can not prevent all the causes of wrecks. So if you're going to run on race tracks, you need to be prepared to crash, regardless of cause or fault.
----------------------------------------------------------------------------------------
My focus in this thread will be primarily safety for high speed road course track cars. Road race cars too. But most road racers KNOW they need to make safety a priority. The group I see slacking & risking their lives unnecessarily are guys running track cars. I feel there is much less risk in AutoX events running 60 mph than there is on a road course running 120 mph. But there are still risks and ways to minimize those risks.
----------------------------------------------------------------------------------------
Here are the topics we'll start with:
Crash Protection
Roll Bars, Door Bars & Cages
Padding
Racing & Full Containment Seats
Seat Belt Harnesses
Fire Suppression System
Fuel Cells
Electrical Shutoff
Insulation
Lexan/Glass
Driver Gear
Helmets
HANS
Fire Suits
Underwear
Gloves & Shoes
Window Nets & Arm Restraints
Preventing Breakage
Suspension Components
Rod Ends & Fasteners
Bearings, Spindles & Front Hubs
Rear Axles, Hubs & C-Clip Eliminators
Driveshaft & U-joints
Wheels & Tires
Fabricated Materials
Preventing Problems
Running Wires, Hoses & Fuel Lines
Radiator Overflow
Brakes Overheating
Exhaust Fumes
Radio Communication
Inspection
Visual & Touch Inspection Routine
Proper Nut & Bolt Strategy
Safety Wire, Locking Nuts & Loctite
#28
New Products & Product Spotlight / Product Spotlight - April 2026...
Last post by Ron Sutton - Apr 20, 2026, 04:09 PMI am Back! I am back in many ways ... one being I'm back doing Technical Services for Individuals building race cars. From Autocross to Track to Road Racing ... If you want to improve how well your car turns ... increase grip ... go faster through the corners ... and win more ... check out Tech Services #24 & #40 HERE!
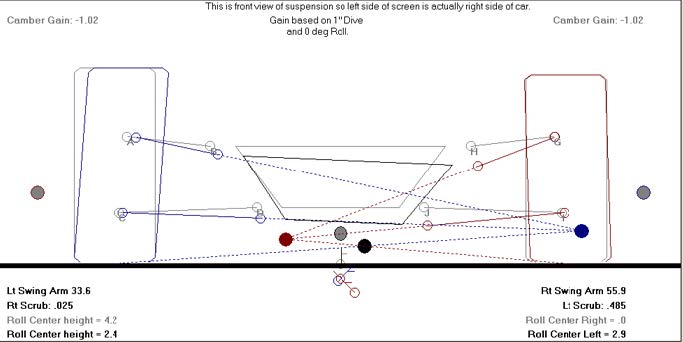
#29
Company Updates & Notices / April 2026 - New Authorized Wa...
Last post by Ron Sutton - Apr 20, 2026, 04:05 PMI am both excited & proud to share the updated list of our Authorized Warrior Builders. These are some of the best race car builders in the United States & New Zealand. Most of them have won races & championships.