

Recent posts
#81
RSRT Product - Packing List & Instructions / Bay Bar Brace Kits - Parts Lis...
Last post by Ron Sutton - Apr 14, 2026, 01:53 PMIf you click on any document below, it will open in Post Images.
Once you're in Post Images, you can ...
* Download the document from there.
* Zoom in by Clicking the Zoom button.
* Or, click on the document again, it will zoom to full size on your screen.
* Once the document is full size, you can print it from there as well, by pressing CTRL & P at the same time.
Please pay attention to the part #s in the upper right box of each form. They are different.
#82
Client Projects & Tips – Muscle Cars / Re: Brakes
Last post by PJ Runnells - Apr 13, 2026, 07:17 PMAwesome will try the power bleeder.
Thanks Ron
Thanks Ron
#83
Client Projects & Tips – Tube Chassis / Re: Scope creep '69 Cougar
Last post by Ron Sutton - Apr 13, 2026, 07:01 PMQuote from: Ryan Kennedy on Apr 13, 2026, 12:13 PMQuote from: Ron Sutton on Apr 12, 2026, 01:34 PMThat seat is awesome. One thing Oval track racers do better is prepare to protect them selves WHEN they crash. Too many "Track Car" guys think it won't happen to them, because they're not planning to push the car 102%. Which is rubbish. A crash at 100mph is a a 100mph crash, regardless of intentions.
I caught myself saying something like this. Had to give myself a little pep talk about it basically as soon as I said it. Noone ever "plans" on crashing. It always happens fast and you have no control over it, hence, "lost control". Someone told me to buy the best safety equipment you can afford, and I've tried to make sure I do that.
A carbon HANS would be nice, but a fiberglass HANS will still save your life - you need one even if its not the best of the best. Make sure and install harnesses correctly. Fire suits are expensive anyway you buy them, so buy the best one you can. Fire extinguisher is better than no fire extinguisher, but you can't really use a handheld extinguisher effectively between the moment you realize you're on fire and the moment you're able to do something about it. I'll do a post on my fire system and harnesses. I think I did them as well as I could have, but its a good topic for discussion.
Something not common knowledge is all SFI suits come with a TPP rating. The SFI numbers themselves can be a little vague. But the TPP number is clear. Every TPP point is 1/2 second before the fire burns through the suit & gets you. Have a 22 TPP suit? You have 11 seconds from the time the fire reaches you until you are burnt. 26 TPP = 13 seconds. NASCAR requires a 39 TPP = 19.5 seconds.
I'm telling you from experience, if your car catches on fire above 120mph, it is hard to get stopped in 11-13 seconds. If you crash (or someone crashes you) & the race car catches fire ... 11-13 seconds happens long before the safety guys reach you. Buy the best suit you can afford, with the highest TPP rating.
#84
Client Projects & Tips – Muscle Cars / Re: Brakes
Last post by Ron Sutton - Apr 13, 2026, 06:53 PMQuote from: PJ Runnells on Apr 13, 2026, 02:40 PMIs anyone running a residual valve on their brake systems? I'm having some pedal bleed down. Have to pump pedal after a bit. Thinking I might need a residual valves. 7/8 Willwood master cylinder was stoptech brakes.
Typically, as long as the master cylinder is higher than the brake calipers, when you have some pedal bleed down, there is some air in the system. Using a power bleeder that pushes the fluid & air out of the lines & back in the master cylinder reservoir is the best way to fix it. If you try & just can't get it, running 2# residual valves is a fix. Not ideal, as it it creates a little drag in the brakes.
#85
Track Tuning Techniques for Overall Handling Balance / Re: Track Tuning for Overall H...
Last post by Ron Sutton - Apr 13, 2026, 06:41 PM Achieving optimum handling & consistency
The goal is to achieve optimum handling for each corner ... and consistency in the handling & feel of the race car. In an ideal world, we would find the optimum Diagonal Roll and achieve it every corner.
The challenges are ...
• Corners vary in several ways: entry speeds, radius, banking, cornering speeds, grip, etc.
• So the braking needs vary from corner to corner.
• Then you have human drivers who can not be perfectly consistent with their turn in points, braking points, degree of turning, lines chosen, degree of braking & length of braking.
• Braking & turning are the factors that cause diagonal roll.
In most suspensions without travel limiters, if you get the suspension set to be very forgiving it will not be as fast as it can be. If you get it "top of the leader board" fast, it is somewhat less forgiving. This is why drivers who can drive at the limit more consistently win races.
Here are some very real world what-ifs that vary from lap to lap:
• What if the driver brakes harder than ideal ... and the car rolls diagonally too much? Car gets loose on entry.
• What if the driver brakes softer than ideal ... and the car rolls diagonally too little? Car is typically fine on entry but pushes in the middle.
• What if the driver brakes too early ... and the car rolls diagonally too little? Car is typically fine on entry but pushes in the middle.
• What if the driver brakes too late ... and the car rolls diagonally too much? Car gets loose on entry.
• What if the driver turns in harder than ideal ... and the car rolls diagonally too much? Car gets loose on entry.
• What if the driver turns in softer than ideal ... and the car rolls diagonally too little? Car is typically fine on entry but pushes in the middle.
• What if the driver combines some of these inconsistencies? We take an otherwise good handling car & turn it into an ugly handling car.
• What if the driver varies these from corner-to-corner ... lap-to-lap? We get inconsistent lap times ... and probably inconsistent feedback from the driver as to what the car needs.
See where the challenges are?
Of course, we need to improve the driver's skills. We need to improve his or her mental awareness of their driving actions, on track, in the thick of things. We need to improve their self-discipline to do the right things for each corner, consistently lap-after-lap. Seat time, driver coaching, seat time, good books, seat time, driving schools, seat time & observing other drivers ... along with more seat time ... can all help the driver to "improve" ... but they'll never stop being human. That is what makes this fun, challenging & interesting.
But what if we could make the car more consistent?
Hmmm. How?
Well, through testing, we can find the optimum Diagonal Roll angle for a car & track. What some don't know, is the optimum Diagonal Roll angle for the fastest corner is not a ton different than the slowest corner. IT IS DIFFERENT ... but not as much as you may think. So, what if we had one strategy to achieve a similar Diagonal Roll angle every time ... and another strategy to vary that Diagonal Roll angle the correct direction & amount for faster & slower corners?
We can ... but we need to control how far the front end suspension travels ... and to a degree, we need to control roll angle too. This is where racing bump stops come into play. These are not to be confused with the "safety bumpers" on many shocks, which are merely there to protect the shock body in the case the shock bottoms out.
Racing bump stops are designed to control suspension travel in racing applications. They are engineered with progressive spring rates that allow us to pick & choose how far they compress & how fast. Combine the right rate of bump stop with quantifiable shims ... and you have the ability to control EXACTLY how far the outside front suspension compresses.
The right bump stop package controls our diagonal roll!
It works like this ...
• If we determine the optimum compression travel for the outside front suspension is X.xx" ... and that not only loads the outside front tire the correct amount ... but the Diagonal Roll angle achieved also disengages the inside rear tire to the optimum degree ... then we shim the front bump stops to limit travel to that exact travel #.
• If the previous non-limited set-up "usually" got to the optimum travel, we will typically decrease the front spring to a degree, to ensure, even with somewhat less braking force, we still get to the optimum X.xx" travel # ... and optimum Diagonal Roll angle.
• Now ... unless the driver is way out to lunch ... the front end will get in "the optimum travel window" in every corner.
But we need a strategy to decrease the Diagonal Roll angle for faster corners ... to a small degree ... and to increase the Diagonal Roll angle for slower corners ... to a small degree. We have two tools at our disposal.
• The primary tool is the "jacking effect" when turning the steering wheel. This de-wedges the suspension to some degree. How much jacking effect we have is controlled by KPI, caster, scrub radius ... and most importantly ... the degree we turn the steering wheel.
• So, in tighter, slower corners, where we need a higher Diagonal Roll angle ... you turn the wheel more ... and get it ... through increased jacking effect.
• In the faster, more sweeping corners, where we need a lower Diagonal Roll angle ... you turn the wheel less ... and get decreased jacking effect.
Cool? Yes, but we're not done. Sometimes the degree of jacking effect in the car is too much or too little. Here is my approach ...
• I have found from experience we put the fastest package on track when we minimize scrub radius and optimize the KPI & caster for optimum tire contact on both front tires when the car is in full dive & roll angle. In other words "dynamically".
• I "usually" do not tune caster or give up scrub radius for more jacking effect. There are exceptions.
• I usually change the rate of bump stops in the front suspension to effect the net front roll angle.
• If I need a higher Diagonal Roll angle when turned harder in tight corners ... I put a softer rate of bump stop in the front suspension.
• If I need a lower Diagonal Roll angle when turned harder in tight corners ... I put a stiffer rate of bump stop in the front suspension.
When I do tune on the geometry for more or less jacking effect, I always do so with a combination of caster & camber change. For example, if the car is good almost everywhere ... but tight/pushy in the tightest corners ... if I have emptied my tool box of other tuning tools & the car still needs a little more jacking effect, I'll do it.
Here is how:
Increasing the caster ... increases the "dynamic camber" split between the two front tires. If the geometry was optimum for the outside front tire ... and if we only increased caster ... the outside front tire would suffer with less grip. That's not helping us get the car turning better. So we need to reduce camber too ... to get the outside tire back to the optimum "dynamic camber" angle it was before. In doing so, the inside front tire now has more "dynamic camber" and therefore more jacking effect. Remember, simply adding caster without subtracting camber can make the car tight/pushy.
Conclusion:
• You can utilize bump stops (& slightly softer springs) to get the car in the Diagonal Roll angle "happy window."
• The bump stop softness/stiffness and jacking effect help optimize the Diagonal Roll angle for different radius/speed corners.
• You can fine tune the Diagonal Roll angle with bump stop softness/stiffness and jacking effect.
--------------------------------------------------------------------------
Bump Stops are often clouded in mystery.
In reality, there are a simple tuning tool for corner entry under braking. They are simply an additional, progressive spring that engages only when you want more spring rate to load the tire & stop the front end travel.
If you have the right setup, they gently stop the front end dive at your target travel amount. Every Time. This loads the front tires more than non-bump stopped setups AND keeps the rear tires loaded. That consistency grip is confidence inspiring, while allowing the driver to learn, experiment & even make errors ... without costly crashes.
Bump stops increase the wheel rate & load the front tires more than regular setups & keeps the rear tires loaded too. That consistent grip is confidence inspiring, while allowing the driver to learn the track, experiment with deeper braking zones & even make errors, without crashes.
Tuning? If the car is loose on entry under braking & turn in, add more shims. If the car is tight or pushy under braking & turn in, remove shims. Yes, it is that easy if you have the right bump stop rate curve. Ron can provide you with the rate charts for all the air & polyurethane bump stops we use, as well as set you up with the optimum starting place for air or poly bumps.
FYI: There are 4 common types of bump stops .... cellular foam, polyurethane, small coil spring & air spring. We don't use cellular foam because they lose rate too quickly with use. We don't use small coil springs because they do not have the progressive rate we want. Poly bumps work well, are least expensive, but do need to be replaced. Air bumps are tunable for any progressive rate we need. So, we don't need to stock a range of polys. But they cost more.


On rough tracks we run softer rate bump stops. On smoother tracks, we can run stiffer rate bump stops to gain more grip & quicker lap times. Pro racers looking for every ounce of grip & lap time will run very high rate bump stops, as long as the track is smooth enough.
Another cool tuning strategy for road courses is being able to tune the grip on corner entry of left hand & right hand corners separately. If the car is loose on entry of left hand corners, simply add a shim to the RF. If the car is tight on entry of left hand corners, simply remove a shim in the RF. Just do the opposite on righthand corners to make ALL the corners optimum!
Final note: Bump stops are one of the few things that increase grip on all 4 corners. The added spring rate at the front wheel loads the front tires more (more grip) while also keeping more load on & grip in the rear tires. In fact, we need to make sure we're not too aggressive with bump stop rates or we'll wear the tires out sooner.
The goal is to achieve optimum handling for each corner ... and consistency in the handling & feel of the race car. In an ideal world, we would find the optimum Diagonal Roll and achieve it every corner.
The challenges are ...
• Corners vary in several ways: entry speeds, radius, banking, cornering speeds, grip, etc.
• So the braking needs vary from corner to corner.
• Then you have human drivers who can not be perfectly consistent with their turn in points, braking points, degree of turning, lines chosen, degree of braking & length of braking.
• Braking & turning are the factors that cause diagonal roll.
In most suspensions without travel limiters, if you get the suspension set to be very forgiving it will not be as fast as it can be. If you get it "top of the leader board" fast, it is somewhat less forgiving. This is why drivers who can drive at the limit more consistently win races.
Here are some very real world what-ifs that vary from lap to lap:
• What if the driver brakes harder than ideal ... and the car rolls diagonally too much? Car gets loose on entry.
• What if the driver brakes softer than ideal ... and the car rolls diagonally too little? Car is typically fine on entry but pushes in the middle.
• What if the driver brakes too early ... and the car rolls diagonally too little? Car is typically fine on entry but pushes in the middle.
• What if the driver brakes too late ... and the car rolls diagonally too much? Car gets loose on entry.
• What if the driver turns in harder than ideal ... and the car rolls diagonally too much? Car gets loose on entry.
• What if the driver turns in softer than ideal ... and the car rolls diagonally too little? Car is typically fine on entry but pushes in the middle.
• What if the driver combines some of these inconsistencies? We take an otherwise good handling car & turn it into an ugly handling car.
• What if the driver varies these from corner-to-corner ... lap-to-lap? We get inconsistent lap times ... and probably inconsistent feedback from the driver as to what the car needs.
See where the challenges are?
Of course, we need to improve the driver's skills. We need to improve his or her mental awareness of their driving actions, on track, in the thick of things. We need to improve their self-discipline to do the right things for each corner, consistently lap-after-lap. Seat time, driver coaching, seat time, good books, seat time, driving schools, seat time & observing other drivers ... along with more seat time ... can all help the driver to "improve" ... but they'll never stop being human. That is what makes this fun, challenging & interesting.
But what if we could make the car more consistent?
Hmmm. How?
Well, through testing, we can find the optimum Diagonal Roll angle for a car & track. What some don't know, is the optimum Diagonal Roll angle for the fastest corner is not a ton different than the slowest corner. IT IS DIFFERENT ... but not as much as you may think. So, what if we had one strategy to achieve a similar Diagonal Roll angle every time ... and another strategy to vary that Diagonal Roll angle the correct direction & amount for faster & slower corners?
We can ... but we need to control how far the front end suspension travels ... and to a degree, we need to control roll angle too. This is where racing bump stops come into play. These are not to be confused with the "safety bumpers" on many shocks, which are merely there to protect the shock body in the case the shock bottoms out.
Racing bump stops are designed to control suspension travel in racing applications. They are engineered with progressive spring rates that allow us to pick & choose how far they compress & how fast. Combine the right rate of bump stop with quantifiable shims ... and you have the ability to control EXACTLY how far the outside front suspension compresses.
The right bump stop package controls our diagonal roll!
It works like this ...
• If we determine the optimum compression travel for the outside front suspension is X.xx" ... and that not only loads the outside front tire the correct amount ... but the Diagonal Roll angle achieved also disengages the inside rear tire to the optimum degree ... then we shim the front bump stops to limit travel to that exact travel #.
• If the previous non-limited set-up "usually" got to the optimum travel, we will typically decrease the front spring to a degree, to ensure, even with somewhat less braking force, we still get to the optimum X.xx" travel # ... and optimum Diagonal Roll angle.
• Now ... unless the driver is way out to lunch ... the front end will get in "the optimum travel window" in every corner.
But we need a strategy to decrease the Diagonal Roll angle for faster corners ... to a small degree ... and to increase the Diagonal Roll angle for slower corners ... to a small degree. We have two tools at our disposal.
• The primary tool is the "jacking effect" when turning the steering wheel. This de-wedges the suspension to some degree. How much jacking effect we have is controlled by KPI, caster, scrub radius ... and most importantly ... the degree we turn the steering wheel.
• So, in tighter, slower corners, where we need a higher Diagonal Roll angle ... you turn the wheel more ... and get it ... through increased jacking effect.
• In the faster, more sweeping corners, where we need a lower Diagonal Roll angle ... you turn the wheel less ... and get decreased jacking effect.
Cool? Yes, but we're not done. Sometimes the degree of jacking effect in the car is too much or too little. Here is my approach ...
• I have found from experience we put the fastest package on track when we minimize scrub radius and optimize the KPI & caster for optimum tire contact on both front tires when the car is in full dive & roll angle. In other words "dynamically".
• I "usually" do not tune caster or give up scrub radius for more jacking effect. There are exceptions.
• I usually change the rate of bump stops in the front suspension to effect the net front roll angle.
• If I need a higher Diagonal Roll angle when turned harder in tight corners ... I put a softer rate of bump stop in the front suspension.
• If I need a lower Diagonal Roll angle when turned harder in tight corners ... I put a stiffer rate of bump stop in the front suspension.
When I do tune on the geometry for more or less jacking effect, I always do so with a combination of caster & camber change. For example, if the car is good almost everywhere ... but tight/pushy in the tightest corners ... if I have emptied my tool box of other tuning tools & the car still needs a little more jacking effect, I'll do it.
Here is how:
Increasing the caster ... increases the "dynamic camber" split between the two front tires. If the geometry was optimum for the outside front tire ... and if we only increased caster ... the outside front tire would suffer with less grip. That's not helping us get the car turning better. So we need to reduce camber too ... to get the outside tire back to the optimum "dynamic camber" angle it was before. In doing so, the inside front tire now has more "dynamic camber" and therefore more jacking effect. Remember, simply adding caster without subtracting camber can make the car tight/pushy.
Conclusion:
• You can utilize bump stops (& slightly softer springs) to get the car in the Diagonal Roll angle "happy window."
• The bump stop softness/stiffness and jacking effect help optimize the Diagonal Roll angle for different radius/speed corners.
• You can fine tune the Diagonal Roll angle with bump stop softness/stiffness and jacking effect.
--------------------------------------------------------------------------
Bump Stops are often clouded in mystery.
In reality, there are a simple tuning tool for corner entry under braking. They are simply an additional, progressive spring that engages only when you want more spring rate to load the tire & stop the front end travel.
If you have the right setup, they gently stop the front end dive at your target travel amount. Every Time. This loads the front tires more than non-bump stopped setups AND keeps the rear tires loaded. That consistency grip is confidence inspiring, while allowing the driver to learn, experiment & even make errors ... without costly crashes.
Bump stops increase the wheel rate & load the front tires more than regular setups & keeps the rear tires loaded too. That consistent grip is confidence inspiring, while allowing the driver to learn the track, experiment with deeper braking zones & even make errors, without crashes.
Tuning? If the car is loose on entry under braking & turn in, add more shims. If the car is tight or pushy under braking & turn in, remove shims. Yes, it is that easy if you have the right bump stop rate curve. Ron can provide you with the rate charts for all the air & polyurethane bump stops we use, as well as set you up with the optimum starting place for air or poly bumps.
FYI: There are 4 common types of bump stops .... cellular foam, polyurethane, small coil spring & air spring. We don't use cellular foam because they lose rate too quickly with use. We don't use small coil springs because they do not have the progressive rate we want. Poly bumps work well, are least expensive, but do need to be replaced. Air bumps are tunable for any progressive rate we need. So, we don't need to stock a range of polys. But they cost more.
On rough tracks we run softer rate bump stops. On smoother tracks, we can run stiffer rate bump stops to gain more grip & quicker lap times. Pro racers looking for every ounce of grip & lap time will run very high rate bump stops, as long as the track is smooth enough.
Another cool tuning strategy for road courses is being able to tune the grip on corner entry of left hand & right hand corners separately. If the car is loose on entry of left hand corners, simply add a shim to the RF. If the car is tight on entry of left hand corners, simply remove a shim in the RF. Just do the opposite on righthand corners to make ALL the corners optimum!
Final note: Bump stops are one of the few things that increase grip on all 4 corners. The added spring rate at the front wheel loads the front tires more (more grip) while also keeping more load on & grip in the rear tires. In fact, we need to make sure we're not too aggressive with bump stop rates or we'll wear the tires out sooner.
#86
Track Tuning Techniques for Overall Handling Balance / Re: Track Tuning for Overall H...
Last post by Ron Sutton - Apr 13, 2026, 06:38 PM Exceptions to the Rule:
There are some tuning items that do NOT SHIFT grip. Earlier I mentioned if you adjust any of shocks too stiff on compression or rebound, and the shock(s) prevent the suspension from following the undulations of the track surface, you lose grip on that end of the car, without gaining grip on the other end of the car. This is a tuning change that doesn't shift grip. It simply reduces grip at the wheels where the shock valving is too stiff.
Suspension bind is a "condition" not tuning. But it can & has led many crew chiefs astray. Suspension bind stops the suspension from working. Similar to the shock being way too stiff. Where we have suspension bind, we lose grip & it doesn't shift that lost grip anywhere.
Rear Roll Steer is another. When you introduce Rear Roll Steer, you are affecting the rear grip only. Yes, you can make the car tight/pushy or free/loose with Rear Roll Steer. But you're only affecting the grip at the rear tires, not the grip of the front tires. This is different than having the shocks too stiff where the only outcome is less grip.
With Rear Roll Steer, you can run positive rear steer to help the car turn better. This reduces rear tire grip when cornering. Or, you can run counter (negative) rear steer. This increases rear grip when cornering.
#87
Track Tuning Techniques for Overall Handling Balance / Re: Track Tuning for Overall H...
Last post by Ron Sutton - Apr 13, 2026, 06:36 PM Tuning the Track Car with Tire Temps
Tire temperatures are an excellent guide for tuning race cars in general, and specifically the front end geometry. Tire pyrometers are a simple tool to get accurate results ... if used correctly. On my race teams, we use either the Longacre or Intercomp digital pyrometer with memory.
You stick the probe into the tire tread (inside first, center next, outside last) ... listen for the "beep" telling you it has the temp ... push the button to "capture" the # ... and move onto the next spot ... all the way around the car. It stores & shows all 12 numbers (4 tires x 3 spots) in one display. We then write the numbers down in what we call a "run sheet" of the car's tuning notebook.
What? You don't have run sheets? No notebook? If you're going to get fast & win events ... better get a notebook & run sheets. Because if you can "remember" all the info from your testing ... you are NOT testing enough and/or not measuring enough key details. I'll post a version of a run sheet on here down the road, so you can download them, customize & print them out.
The digital pyrometers we use with memory, save a lot of valuable time ... when the tire is cooling off fast ... because you don't have to write as you go. But they are a little spendy. The versions we use, also have a 4-car lap timer built in them, so the crew can time our car & up to 3 competitors at the same time. It stores all the info for putting into the run sheets after the session.
--------------------------------------------------------------------------------------------------
It is expensive, but will make you go faster than any other $400 you'll spend. Go HERE.
For a little less expensive version, with no stop watch, go HERE.
* I like & recommend Pegasus Auto Racing Supplies as a good source for small parts, tools, etc. they are road racers & know their shit.
Do not use an infrared temp gun. It's not ok. The misinformation IS WORSE than no information. The reason is simple. The surface of the tire cools fast ... and equalizes. Surface temps will not show you accurate differences across the tread or from tire to tire. Use a probe type pyrometer. End of story.
Being consistent is critical, or numbers varying from run to run will make you crazier than you already are. Slicks are easy ... we measure 1" in the inside ... dead center & 1" in from the outside. Note: Some slicks have relatively thin surfaces, so stick the sharp probe into the rubber deep at a 45 degree angle, so you don't pop the tire.
On treaded or grooved tires, the 1" number may put the probe in a funky spot on the tire blocks or close to a groove. My rule of thumb is to put the probe into the center of the outside tread blocks or runners, hopefully in the ½" to 1" range for the edges of the tire. With thicker street tires you can go straight in with the probe. Go deep.
Be consistent with your depth & placement of the probe into the tire tread ... and always go in the same order ... as quickly as you can before the tires cool too much ... and you'll have the most valuable data available for tuning.
I'll map out how we do tire monitoring and we can go from there.
First, I decide if we're running air or nitrogen. I always prefer nitrogen if it is practical to use, just because there is much less pressure change as heat builds up in the tires. If it is my first time running a tire, I reach out to the manufacturer & get a suggested operating pressure window for the tires & start right in the middle ... and test.
I'm looking for the optimum hot operating tire pressure. In doing so, we're always
going to:
1. Set the tire pressure before we go out.
2. Check & note the tire temps as soon as the car rolls into the pits.
3. Check & note the tire pressures right after that.
4. Reset the "go out" tire pressures with what we learned to achieve optimum hot temps &
pressures.
When the car comes back into the pits, I have a guy with a memory tire pyrometer take all 12 readings ASAP. He puts the probe deep into the rubber ... about 1" from the inside edge of the tire ... then the middle ... and then about 1" from the outside edge of the tire ... and captures these numbers for review.
Most guys know if the temps are low in the middle, the tire pressure is too low. If the temp is high in the middle the pressure is too high. Adjust the "go out" tire pressures until the car comes back with correct middle temps. Pay attention & note the tire pressure gain each session until you have a handle on this.
What's common ... especially if the front geometry is off ... is to see one edge of the tire hotter than the other edge. Obviously you have an issue you need to correct, but for sake of your track day, you need to optimize the tire the best you can. If the tire is hotter on one edge ... split the difference ... and that is your target center temperature. So if the front tires read 145°-130°-129° ... the center is too cool and the tire needs more pressure until the tire comes back reading around 145°-137°-129°. This isn't optimum. Far from it. You need to correct the geometry and get the temps closer. How close is based on your performance standards. I get mine within 2°.
Once the tire temps guide you to the optimum "roll into the pits" tire temps & pressures, that will be your target every time. For sake of discussion, let's say the optimum tire pressures come back at 32 psi front & rear. Your "go out" pressure will depend on two factors ... how much do the tire pressures increase in a session and how cool or warm are the tires before your track session.
When you first get to the track, and the tires are ambient temperature ... "cold" ... you will need to start with lower pressures, because the tire pressures will grow the largest amount on the first run. Again, just for discussion, let's say you find you need to start at 25 psi front & rear on "cold" tires ... and after your first session the tires come back in at 32 psi. For the next session, your "go out" pressures with "warm" tires will need to be below 32 & above 25 ... unless the car sits so long the tires get "cold" again. You may find the tires only typically grow 4 degrees from "warm" to "hot" so your go out pressures
would be 28.
Only experience can tell you how much the tire pressures will grow from cold-to-hot and from warm-to-hot. But once you have these numbers you can plan accordingly. There are many factors that affect this though. If the day is particularly hot ... the tires will grow more pressure, so you start lower. The reverse is true for cold days with little to no sunshine on the asphalt.
You may find your front & rear tires grow pressure at different rates. Pressure gain is all about heat & work. So if the rears grow more pressure than the fronts, you probably have a loose condition on entry, middle or exit ... over working those rear tires. The driver needs to give feedback as to whether they're spinning the tires on exit or sliding on entry and/or middle. Conversely, higher pressure growth in the front tires signal a car that is tight/pushy ... or potentially being overdriven on corner entry.
Another factor in tire temps is brake heat. If the driver is abusing the brakes, the tires will be hotter. If the brake bias is correct, this will affect the front tires more, as the front brakes run hotter.
Through experience, you want to develop a "typical" pressure growth from cold-to-hot tires so you know how to set your tires before your first session. And you want to develop a "typical" pressure growth from warm-to-hot tires so you know how to set your tires before your subsequent sessions. And you want to be aware of the factors that may affect tire pressure growth ... like braking issues, being over driven, track temps, etc ... so you can adjust your "go out" pressures to still achieve the optimum hot pressures.
If you care about having a good track day, and want to have a good handling car and work on your driving ... you need tire & brake rotor temps. These two will help you learn more, run better, be safer and improve more than anything else you do. Always check tire temps (with a probe pyrometer) & pressures when you roll back in. Check all 4 rotor temps with an infrared pyrometer. And always write your notes in a book.
From this info you can tell a ton about how the driver & car are doing. Plus, you can spot problems before they bite you. The brake rotor temps can tell you if you're braking too much, too little or just right. they can tell you if you have a correct brake bias ... or too much front or rear braking. The tire temps & pressures can tell you if you're over driving or under driving the entries, middles and/or exits of the corners. They can tell you if you have a balanced or unbalanced car. They can tell you if geometry issues.
--------------------------------------------------------------------------------
Let's run through some examples ... assuming we have a track or road race car on a road course running equal size Hoosier R7 slicks front & rear ... with an optimum tire temp around 190 degrees. I'll start with the basics & progress. Here is what the tire temps tell us.
Across the face of the tread
LF 190 180 190 RF 190 180 190
LR 180 190 180 RR 180 190 180
Conclusion: Front tires are under inflated & rear tires are over inflated.
Difference left to right
LF 180 180 180 RF 190 190 190
LR 180 180 180 RR 190 190 190
Conclusion: Either the track has more LH turns than RH, the car has more right side weight bias, the car's suspension is set up for a higher Roll Angle on LH turns & lower Roll Angle on RH turns or some combination of these causes.
Difference front to back – Part 1
LF 210 210 210 RF 210 210 210
LR 190 190 190 RR 190 190 190
Conclusion: Car is tight and/or pushing, the driver is over driving the car on corner entry or both.
Difference front to back – Part 2
LF 170 170 170 RF 170 170 170
LR 220 220 220 RR 220 220 220
Conclusion: Car is loose, the driver is over powering the tires on corner exit or both.
Difference opposing corners
LF 180 180 180 RF 190 190 190
LR 190 190 190 RR 180 180 180
Conclusion: Car has cross weight in the suspension set-up causing it to be tighter on LH corners & more free on RH corners.
Difference on edges – Part 1
LF 200 190 180 RF 180 190 210
LR 190 190 190 RR 190 190 190
Conclusion: Front wheels & tires do NOT have enough Dynamic Camber. (Do not confuse this with Static Camber or Camber Gain.)
Difference on edges – Part 2
LF 185 190 195 RF 195 190 185
LR 190 190 190 RR 190 190 190
Conclusion: Wheels & tires have too much Static Camber.
What if one tire is too cool
LF 190 190 190 RF 190 190 190
LR 180 180 180 RR 190 190 190
Conclusion: Either due to track or driver, the car is exiting some RH corners easier or gentler. Cross weight may be slightly off as well.
What if one tire is too hot
LF 205 205 205 RF 190 190 190
LR 190 190 190 RR 190 190 190
Conclusion: Either due to track or driver, the car is entering some RH corners deeper & more aggressively. Or you have a brake caliper dragging on that corner.
What if all the tires are too cool
LF 160 160 160 RF 160 160 160
LR 160 160 160 RR 160 160 160
Conclusion: Either the driver is under driving the car, the car has too small of a Roll Angle, the track surface is cold ... or a combination of these issues.
What if all the tires are too hot
LF 210 210 210 RF 210 210 210
LR 210 210 210 RR 210 210 210
Conclusion: Either the driver is over driving the car, the car has too large of a Roll Angle, the track surface is super hot ... or a combination of these issues.
There is a lot more to this. These were just some samples. With experience, you can learn how to read tire temps, differences & even the face of the tire & know what the car is doing. Remember harder compound tires have lower operating temperatures than my samples. And as tires age, the rubber hardens, so they will run cooler too ... because they're "dead" ... meaning the rubber has hardened.
Having & using a tire durometer is smart too. (like THIS) It will let you know the condition of tires & if you have a "bad" tire. We ran 6 USAC Midgets and set-up them up as identically as is possible with humans. Spring rates within 3#, shock valving within 5#, ride heights within .010" ... you get the point. When we roll all of them out at the track on new rubber & one of them handles differently than the rest ... we check the tires with a durometer before anything else.
Sure enough ... if a front tire is harder than is normally should be ... or a rear tire is softer than it should be ... that car pushes. Vice versa too. You can tune & tune & tune, but all you're doing to putting a band-aid on the problem and you're going to have bad days as long as that tire is on the car. We simply change the tire. Problem solved & sanity returns to what you're doing.
A lot of people ask me what are acceptable split numbers ... either across the tread ... or from side to side. "Acceptable" varies with the person ... like saying it's cold. My wife says it cold when its 60 degrees. Having lived in parts of the country where it gets in the teens or occasionally single digits ... 60 is a pleasant spring day ... to me.
An acceptable tire temp variance is different with each tuner. I know a lot of racers have a larger "acceptable" window than me & are ok with ... 5-10-15 degrees differences. I'm not looking for "acceptable" ... unless that is the new term for "optimum." Optimum is 2 degrees or less across the face of the tire. Any more than that, and my race crew has tools out.
As with all guidelines, there are exceptions. I've seen series with tires so hard the only way to get heat in them was to run them on the edges or over inflate them & run them on the center. But for most racing tires & most low tread wear performance street tires ... my number is 2 degrees. If I'm road racing, I allow no more the same 2 degrees from side to side. If it's more, we're tuning on it to get more grip & speed.
When I tell you I have often achieved tire temps within that same 2 degree window ... comparing side to side ... when I was oval track racing stock cars ... after you stop calling me a liar ... realize we ran very low Roll Angle ... and we can tune some things "special" because we're only turning left.
Heck, we have had the left front & left rear tires HOTTER than the right side tires on an oval track. That's not optimum. I just don't want you to think the outside tires always have to be hotter & "accept" that.
Maximizing front tire grip is the key factor to corner speed & lap times. Front tire grip is my highest priority. Because adjusting the rear grip to match the front grip ... for a balanced "neutral" handling car ... is relatively easy.
Said another way, If the front tires can only maintain 52.3 mph in corner X ... then the car is only going to go 52.3 mph through corner X. Anything you do to adjust rear grip isn't going to make the car going faster than 52.3 mph through corner X. You could make the car loose ... or push ... and go slower than 52.3 mph ... but not faster. The only time the rear grip is the limiting factor is if your setup or tuning is not working, or we have a high rear weight bias race car.
If we tune on the front geometry & raise the front tires grip so it would carry 52.7 mph through corner X ... and then we tune the rear grip to balance that ... we raised our corner speed .4 mph in corner X ... and probably most of the other corners too.
If a car I'm working on has more than 2 degrees temp split across the tire ... or difference side to side ... we're getting tools out.
When you go to the track for your initial test & tune, remember these key points:
• Balance the high speed corner handling with aero downforce ... specifically rear wing adjustment.
• Balance the low & mid speed corner handling with suspension tuning ... specifically rear Roll Center, shock valving, spring & sway bar rates.
• If the front end geometry is not optimum, corner speeds will be down in the tighter corners & the tire temps will tell you why. Tune accordingly.
In my experience the priority for tuning the front suspension geometry is the tighter, low & mid speed corners ... as long as the car is not loose in the high speed corners. On any given road course these different corners will have different needs. You may find (with DAQ) you've got 21° of steering in one corner and 9.5° in another. Obviously those steering differences are going to produce very different dynamic Camber numbers ... as they should.
A great test & tune tool is a skid pad. (It's a good driver training tool too.) If you have access to a safe, controlled, flat, measured parking lot skid pad ... it is killer for testing geometry & tire temps. I suggest you set the radius to match your most challenging corners. You can go either direction (clockwise or counter) but pick just one & stick with it for the day. For our conversation, let's say clockwise.
Use a tire pyrometer with a probe (no infrared) to measure the temps in the center of the tread ... and both inside & outside of the tread. Stick probe in rubber DEEP about 3/4"-1" in from the edge of the tread on each side & in the middle. Writes notes every time.
Tuning tips:
• If the car ends up rolling more than projected, you'll want to increase the Caster to keep both tires at optimum angles for full contact patches. If the car ends up rolling less than projected, you'll want to decrease the Caster to keep both tires at optimum angles for full contact patches. See examples 1 & 2.
• When need Camber to help responsiveness at turn in but it hinders the inside tire achieving optimum contact patch for turning grip through the corner ... so don't get greedy with Camber. See examples 3 & 4.
• Increasing the Caster & decreasing the Camber increases the "split" or difference in Dynamic Camber between the outside & inside tires.
Decreasing the Caster & increasing the Camber decreases the "split" or difference in Dynamic Camber between the outside & inside tires. See
examples 5, 5A, 6 & 6A.
For a clockwise skidpad , if BOTH the outside of the LF tire & the inside of the RF tire are hotter than the rest of the tire, reduce the Caster. If they're BOTH cooler, increase the Caster.
Examples:
#1 - If LF reads: 141-135-130 ... & RF reads: 161-155-150 = Car is rolling less than projected ... so reduce Caster
#2 - If LF reads: 130-135-141 ... & RF reads: 150-155-161 = Car is rolling more than projected ... so increase Caster
If the inside of BOTH tires are hotter than the rest of the tire, reduce the Camber. If the insides are cooler, increase the Camber.
Examples:
#3 - If LF reads: 130-135-141 ... & RF reads: 161-155-150 = reduce Camber
#4 - If LF reads: 141-135-130 ... & RF reads: 150-155-161 = increase Camber
When one tire is optimum & the other is not ... adjust the Dynamic Camber split.
Examples:
#5 - If LF reads: 130-135-141 ... & RF reads: 161-160-159 = Needs more Dynamic Camber "split" ... so increase the Caster & decrease the Camber.
0r #5A - LF reads: 141-140-139 ... & RF reads: 161-155-150 = Needs more Dynamic Camber "split" ... so increase the Caster & decrease the Camber.
#6 - If LF reads: 141-135-130 ... & RF reads: 161-160-159 = Needs less Dynamic Camber "split" ... so decrease the Caster & increase the Camber.
0r #6A - LF reads: 141-140-139 ... & RF reads: 150-155-161 = Needs less Dynamic Camber "split" ... so decrease the Caster & increase the Camber.
Ultimately, you want the temps across the tires to be within 2° when driven at 102%.
#88
Track Tuning Techniques for Overall Handling Balance / Re: Track Tuning for Overall H...
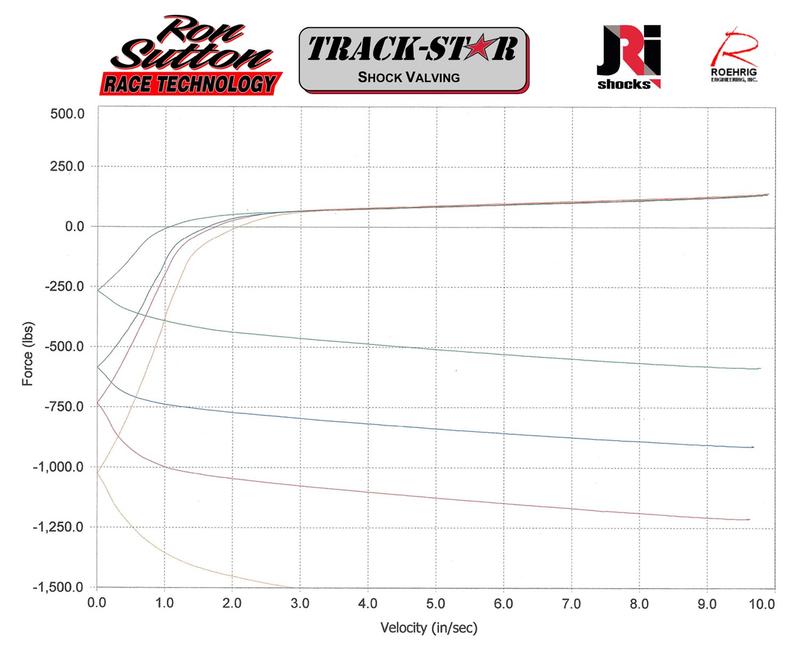
Last post by Ron Sutton - Apr 13, 2026, 06:34 PM Shock rebound adjustability takes priority over compression adjustability. Why?
Simple. On compression the spring rate & shock compression valving are working together. On rebound the spring rate & rebound vavling are opposing each other.
On compression the shock valving is providing some hydraulic resistance that adds to the spring rate, slowing down the rate of compression on that corner of the car. For conversation sake, let's say we have two cars, one with 900# front springs expecting to dive 1 inch under hard braking. The second car with 300# springs expecting to dive 3 inches under hard braking. If our front shock compression valing provides 50-100# hydraulic resistance, all we were doing is slowing down the rate of compression of that 900# or 300# spring.
But on rebound, the shock valving is the ONLY thing slowing the lift (rebound) of that corner of the car. Some racers describe it as the shock & spring are fighting each other in rebound. Again, for example sake, let's utilize those same two cars. Both have 900# of stored spring energy in full dive under hard braking ... just waiting for the driver to release the brakes.
Once the driver releases the brakes that 900# of stored energy from the compressed spring (on each side) wants to pop the front end of the car up instantly. 50-100# hydraulic resistance wouldn't do much to slow that spring "boing!" LOL We need much more rebound resistance & the ability to adjust the rebound resistance.
Now you should realize WHY the rebound valving of the shocks ... and having a wide adjustable range on the rebound valving ... is so important. The shock's rebound valving is the only thing controlling the spring rate coming back up. This is why shock rebound adjustability takes priority over compression adjustability.
Being able to adjust the compression valving over a wide range is valuable, but not as valuable as the rebound adjustability. For this reason, double adjustable shocks are not twice as good for tuning ... as long as our single adjustable shocks are rebound adjustable. Another key thing to know is increasing the rebound valving is how we create more grip. The front rebound valving rate is how we create more front tire grip mid-corner ... the key to carrying more corner speed.
Shock rebound adjustability takes priority over compression adjustability in the rear as well. Increasing the rear rebound valving rate is how we create more rear tire grip on corner exit, under throttle. This additional rebound keeps the rear tires loaded longer on exit. Increased rear rebound valving rate also increases rear tire grip on corner entry under braking. It holds the rear of the car down longer ... keeping load on the rear tires ... even though the front end has dived under braking.
But if we get "greedy" & dial in too much rear rebound valving rate, the rear tires will literally lift with the chassis/body as the driver brakes hard into a corner. This unloads the rear tires, making the car loose on entry. So the goal is to run all the rear rebound valving you can, without being loose on entry.
The old school belief the driver needs to always be on the gas or brake, and never coast, is no longer true. It used to be true, but modern shock technology changed that. See driving line below. Green is throttle on. Red is brake on. Blue is neither. The race car is rolling (or coasting). This is called the "Roll Through Zone."

Visualize this, it's corner entry on a fast course. The driver brakes hard & the front end dives a certain amount ... then, while still braking, the driver initiates steering into the corner. Ideally this racer has dialed in their camber, caster, toe & Ackerman settings to create optimum front tire contact patches while in dive, roll & turning. If they are advanced, they've worked out their roll center to load the tires optimally too. Plus, the front CG is lower (by the amount of dive), less air is flowing under the car & more air is flowing over the hood creating downforce.
But when the driver steps off the brakes, deep into the corner, the stored energy from the compressed front springs pushes the front end up in milliseconds. You instantly have less contact patch on both tires, the roll center is no longer optimum, the front CG is higher & more air is flowing under the car again. The car instantly goes into a push condition (understeer).
For this reason, old school racers learned to keep brake pressure on, all the way to the point where they needed to get back on the throttle. That's where the phrase "you need to always be on the gas or brake, and never coast" came from. BUT ... this longer braking zone is scrubbing off lots of speed, killing lap time.
Modern shock technology has cured this. Winning Pro Racers learned they could modify the shock bleed circuit to keep the front end "tied down" for a short, controlled time. The rest of the time, the shocks work normal.
This tie-down allows the driver to get off the brakes and the front end stays down where the tire contact patches are optimum, the roll center is optimum, the front CG is lower & the airflow is still going over the car, not under it. This allows the driver to get completely off the brakes earlier, creating a "roll thru zone", before throttle pick up without pushing (understeer)!
Back in the day this "roll thru zone" did not exist unless you were going so slow it didn't matter, which the fast racers called coasting. Now, with the front end tied down for a short period of time, before the throttle pick up point, the driver can carry greater mid-corner speed.
The longer the tie-down time, the more speed we can carry through the corner. Ron Sutton has literally seen 3-5 mph mid-corner speed increases from racers switching to the new tie down shock technology. But, factors like how long the corner is & how rough the track surface is, play a role in how long we can tie the front end down.
If we get "greedy" & dial in too much front tie down valving rate, the front tires will literally skip over the asphalt undulations in the corner, creating a push (understeer) towards the outside of the corner.
Your goal at each track is to find the limit of tie down you can run, without creating a push condition.
Ron Sutton's Front Tie-Down Guide:
1. 200-400# (0.25 – 0.50 sec) Works Best for Autocross
2. 400-600# (0.50 - 0.90 sec) Works Best for Rough Road Courses
3. 600-800# (0.90 - 1.30 sec) Works Best for Average Road Courses
4. 800-1000# (1.30 - 1.70 Sec) Works Best for Smooth Road Courses
5. 1000-1200# (1.70 – 2.10 Sec) Works Best for Super Smooth Road Courses
Shock Tuning Tips
Make these tuning changes in this order:
1. Stiffen the bleed adjuster on the front shocks to help keep the nose pinned down in the roll through zone. Go stiffer until the car gets loose on corner exit ... or starts skipping the front tires & pushing mid corner. When you experience either of these ... soften the bleed back up ... until these conditions stop.
2. Stiffen the rebound valving on the front shocks to slow the rise of the nose on corner exit acceleration. Go stiffer until the car gets loose on corner exit ... or starts skipping the front tires & pushing mid corner. When you experience either of these ... soften the bleed back up ... until these conditions stop.
3. Stiffen the rebound valving on the rear shocks to help keep the rear planted all the way out of the corner on exit. Go stiffer until the car gets loose on corner entry ... or starts hopping the rear tires in any part of the corner. When you experience either of these ... soften the bleed back up ... until these conditions stop.
4. Stiffen the bleed adjuster on the rear shocks to help keep the rear planted all the way out of the corner on exit. Go stiffer until the car gets loose on corner entry ... or starts hopping the rear tires in any part of the corner. When you experience either of these ... soften the bleed back up ... until these conditions stop.
5. If the car is loose on corner entry upon initial dive under braking ... AKA landing on the bump stops ... you can adjust the front shock compression valving stiffer until it stops. Do not stiffen the compression adjuster anymore than it needs, as this adds hysteresis into the suspension. Chose another suspension tuning option first if it is available.
6. If the car is tight/pushy on corner entry upon initial turn-in ... you can adjust the rear shock compression valving stiffer until it turns betters. Do not stiffen the compression adjuster anymore than it needs, as this adds hysteresis into the suspension. Chose another suspension tuning option first if it is available.
Steps #1 & #2 will help the car turn better "mid-corner" when you're "rolling or coasting" with no brakes or throttle. We call this critical area the "Roll Through Zone." Steps #3 & #4 will provide more grip on corner exit. Pay attention to when it affects grip on entry & middle.
The middle of the corner is the highest priority. If the car won't turn well in the middle, the entry & exit are inconsequential. Don't accept any tuning change that hurts the "Roll Through Zone" handling & speed.
Do these in this order & take lots of notes. You won't be able to remember all the details accurately. I don't know any top race teams that don't use "run sheets" to keep track of changes, results, etc. Keep a report of each run, with all 4 shock settings, the handling results on corner entry (braking & turning), Middle (coast) & Exit (throttle roll on & steering unwind) ... and the differences from the previous run. You'll learn firsthand what changes do.
-------------------------------------------------------------------
Then, go back through the same process, but fine tune with 2 clicks, then 1 click until you find the best balance. Experiment with a "little here & a little there" strategy. Experiment with a "less here & more there" strategy.
Once you're "happy" with the handling ... this is your baseline set-up. Write it down & place it in a vault. Whenever you find yourself "out-to-lunch" with tuning ... go back to your baseline. If after more events & testing, you improve on your shock settings, make that your new baseline. Write it down & place it in a vault. Whenever you find yourself "out-to-lunch" with tuning ... go back to your baseline.
FYI: If you adjust any of shocks too stiff on compression or rebound, and the shock(s) prevent the suspension from following the undulations of the track surface, you lose grip on that end of the car, without gaining grip on the other end of the car. This is one tuning change that doesn't shift grip. It simply reduces grip at the wheels where the shock valving is too stiff.
Fine Tuning for Day, Track, Conditions, Etc.
Loose Entry:
• Stiffen the bleed and/or rebound valving on the rears. You "may" gain grip back on entry. If it gets better, go until the car gets loose again on corner entry & back up ... or until you run out of adjustment. If it gets worse ... stop & back up to the baseline setting ... and move on to the next step.
• If still loose ... stiffen the bleed and/or rebound valving on the rears. You "may" gain grip back on entry. If it gets better, go until the car gets loose again on corner entry & back up ... or until you run out of adjustment. If it gets worse ... stop & back up to the baseline setting ... and move on to the next step.
If still loose ...
• If you think the front end is traveling too far (not too fast) ... add equal thickness bump stop shims to each front shock.
• Reduce rear braking force with adjustable proportioning valve.
• Try braking softer & longer.
• As a last resort of shock tuning, stiffen compression on front shocks until the car grips up on entry. Don't go any stiffer than needed, as this may tighten up the roll through zone & it adds hysteresis into the suspension.
• If still loose on entry, the cure may require a stiffer front springs or sway bar rate.
Tight/Pushy Entry:
• If you are not already full soft on the front shock compression valving ... then soften compression on front shocks until the car frees up on entry. Don't go any softer than needed, as this will make the car loose on entry.
• If you think the front end is not traveling far enough ... remove equal thickness bump stop shims to each front shock.
• If still tight/pushy ... soften the bleed and/or rebound valving on the rears. Go until the car gets loose again on corner entry turning & back up ... or until you run out of adjustment.
• If still tight/pushy ... stiffen the compression on the rears. Go until the car gets loose again on corner entry turning & back up ... or until you run out of adjustment. Don't go any stiffer than needed, as this may loosen up the grip on corner exit & it adds hysteresis into the suspension.
• If still tight/pushy on entry, induce rear braking force with adjustable proportioning valve.
• If still tight/pushy on entry, try braking harder.
• If still tight/pushy on entry, the cure will require a softer front spring rate.
Loose during "roll through zone" only:
• Pinch yourself, because you're dreaming. Or, you have over slowed the race car.
• Are you sure the car isn't loose, or pushing, on entry causing the car to get loose in roll through zone only?
• This is great news ... brake softer, but the same length & increase the roll through zone speed until the car comes back to neutral handling. If it gets tight, you may need to brake slightly harder to decrease roll through zone speed & cure it.
• Ok, if it is really loose in roll through zone only ... soften up the bleed valving on the front shocks.
Tight/Pushy during "roll through zone" only:
• If you think the front end is not down on the track far enough ... remove equal thickness bump stop shims to each front shock.
• Stiffen bleed on the front shocks until the car frees up in the roll through zone.
• If still tight/pushy in the roll through zone, stiffen the rebound valving on the front shocks until the car frees up in the roll through zone.
• If still tight/pushy in the roll through zone, soften the rebound valving on the rear shocks until the car frees up in the roll through zone.
• If still tight/pushy during "roll through zone" only, brake harder, but the same length & decrease the roll through zone speed until the car comes back to neutral handling.
• If still tight/pushy in the roll through zone, the cure will require more than shock & braking adjustment.
Loose Exit:
• Stiffen the rebound valving on the rears. Go until the car gets tight on exit ... or loose on corner entry ...and back up ... or go until you run out of adjustment.
• If still needs more grip ... stiffen the bleed valving on the rears. Go until the car gets tight on exit ... or loose on corner entry ... or you experience rear wheel hop anywhere ... and back up ... or go until you run out of adjustment.
• If still loose, soften the rebound valving on front shocks until the car grips up on exit ... or gets tight in the roll through zone. Don't go any softer than needed, as this will tighten up the roll through zone.
• Do not soften the bleed valving on the front shocks UNLESS the roll through zone is awesome AND the tires spin the instant you touch the throttle.
• If still loose on exit, experiment rolling the throttle on later or slower.
• If still loose on exit, the cure will require more than a shock or driving adjustment.
Tight/Pushy Exit:
• If any adjustment range left, stiffen the bleed valving on the front shocks. Go until the car gets good on exit ... or go until you run out of adjustment.
• If still tight/pushy on exit ... and if any adjustment range left ... stiffen the rebound valving on the front shocks. Go until the car gets good on exit ... or go until you run out of adjustment.
• If still tight/pushy on exit, soften the bleed valving on the rears. Go until the car gets good on exit ... or until it hurts the entry ... or until you run out of adjustment.
• If still tight/pushy on exit, soften the rebound on the rears. Go until the car gets good on exit ... or until it hurts the entry ... or until you run out of adjustment.
• If still tight/pushy on exit, experiment rolling the throttle on later or slower.
• If still tight/pushy on exit, the cure will require more than a shock or driving adjustment.
 [/b]
[/b]
Simple. On compression the spring rate & shock compression valving are working together. On rebound the spring rate & rebound vavling are opposing each other.
On compression the shock valving is providing some hydraulic resistance that adds to the spring rate, slowing down the rate of compression on that corner of the car. For conversation sake, let's say we have two cars, one with 900# front springs expecting to dive 1 inch under hard braking. The second car with 300# springs expecting to dive 3 inches under hard braking. If our front shock compression valing provides 50-100# hydraulic resistance, all we were doing is slowing down the rate of compression of that 900# or 300# spring.
But on rebound, the shock valving is the ONLY thing slowing the lift (rebound) of that corner of the car. Some racers describe it as the shock & spring are fighting each other in rebound. Again, for example sake, let's utilize those same two cars. Both have 900# of stored spring energy in full dive under hard braking ... just waiting for the driver to release the brakes.
Once the driver releases the brakes that 900# of stored energy from the compressed spring (on each side) wants to pop the front end of the car up instantly. 50-100# hydraulic resistance wouldn't do much to slow that spring "boing!" LOL We need much more rebound resistance & the ability to adjust the rebound resistance.
Now you should realize WHY the rebound valving of the shocks ... and having a wide adjustable range on the rebound valving ... is so important. The shock's rebound valving is the only thing controlling the spring rate coming back up. This is why shock rebound adjustability takes priority over compression adjustability.
Being able to adjust the compression valving over a wide range is valuable, but not as valuable as the rebound adjustability. For this reason, double adjustable shocks are not twice as good for tuning ... as long as our single adjustable shocks are rebound adjustable. Another key thing to know is increasing the rebound valving is how we create more grip. The front rebound valving rate is how we create more front tire grip mid-corner ... the key to carrying more corner speed.
Shock rebound adjustability takes priority over compression adjustability in the rear as well. Increasing the rear rebound valving rate is how we create more rear tire grip on corner exit, under throttle. This additional rebound keeps the rear tires loaded longer on exit. Increased rear rebound valving rate also increases rear tire grip on corner entry under braking. It holds the rear of the car down longer ... keeping load on the rear tires ... even though the front end has dived under braking.
But if we get "greedy" & dial in too much rear rebound valving rate, the rear tires will literally lift with the chassis/body as the driver brakes hard into a corner. This unloads the rear tires, making the car loose on entry. So the goal is to run all the rear rebound valving you can, without being loose on entry.
The old school belief the driver needs to always be on the gas or brake, and never coast, is no longer true. It used to be true, but modern shock technology changed that. See driving line below. Green is throttle on. Red is brake on. Blue is neither. The race car is rolling (or coasting). This is called the "Roll Through Zone."
Visualize this, it's corner entry on a fast course. The driver brakes hard & the front end dives a certain amount ... then, while still braking, the driver initiates steering into the corner. Ideally this racer has dialed in their camber, caster, toe & Ackerman settings to create optimum front tire contact patches while in dive, roll & turning. If they are advanced, they've worked out their roll center to load the tires optimally too. Plus, the front CG is lower (by the amount of dive), less air is flowing under the car & more air is flowing over the hood creating downforce.
But when the driver steps off the brakes, deep into the corner, the stored energy from the compressed front springs pushes the front end up in milliseconds. You instantly have less contact patch on both tires, the roll center is no longer optimum, the front CG is higher & more air is flowing under the car again. The car instantly goes into a push condition (understeer).
For this reason, old school racers learned to keep brake pressure on, all the way to the point where they needed to get back on the throttle. That's where the phrase "you need to always be on the gas or brake, and never coast" came from. BUT ... this longer braking zone is scrubbing off lots of speed, killing lap time.
Modern shock technology has cured this. Winning Pro Racers learned they could modify the shock bleed circuit to keep the front end "tied down" for a short, controlled time. The rest of the time, the shocks work normal.
This tie-down allows the driver to get off the brakes and the front end stays down where the tire contact patches are optimum, the roll center is optimum, the front CG is lower & the airflow is still going over the car, not under it. This allows the driver to get completely off the brakes earlier, creating a "roll thru zone", before throttle pick up without pushing (understeer)!
Back in the day this "roll thru zone" did not exist unless you were going so slow it didn't matter, which the fast racers called coasting. Now, with the front end tied down for a short period of time, before the throttle pick up point, the driver can carry greater mid-corner speed.
The longer the tie-down time, the more speed we can carry through the corner. Ron Sutton has literally seen 3-5 mph mid-corner speed increases from racers switching to the new tie down shock technology. But, factors like how long the corner is & how rough the track surface is, play a role in how long we can tie the front end down.
If we get "greedy" & dial in too much front tie down valving rate, the front tires will literally skip over the asphalt undulations in the corner, creating a push (understeer) towards the outside of the corner.
Your goal at each track is to find the limit of tie down you can run, without creating a push condition.
Ron Sutton's Front Tie-Down Guide:
1. 200-400# (0.25 – 0.50 sec) Works Best for Autocross
2. 400-600# (0.50 - 0.90 sec) Works Best for Rough Road Courses
3. 600-800# (0.90 - 1.30 sec) Works Best for Average Road Courses
4. 800-1000# (1.30 - 1.70 Sec) Works Best for Smooth Road Courses
5. 1000-1200# (1.70 – 2.10 Sec) Works Best for Super Smooth Road Courses
Shock Tuning Tips
Make these tuning changes in this order:
1. Stiffen the bleed adjuster on the front shocks to help keep the nose pinned down in the roll through zone. Go stiffer until the car gets loose on corner exit ... or starts skipping the front tires & pushing mid corner. When you experience either of these ... soften the bleed back up ... until these conditions stop.
2. Stiffen the rebound valving on the front shocks to slow the rise of the nose on corner exit acceleration. Go stiffer until the car gets loose on corner exit ... or starts skipping the front tires & pushing mid corner. When you experience either of these ... soften the bleed back up ... until these conditions stop.
3. Stiffen the rebound valving on the rear shocks to help keep the rear planted all the way out of the corner on exit. Go stiffer until the car gets loose on corner entry ... or starts hopping the rear tires in any part of the corner. When you experience either of these ... soften the bleed back up ... until these conditions stop.
4. Stiffen the bleed adjuster on the rear shocks to help keep the rear planted all the way out of the corner on exit. Go stiffer until the car gets loose on corner entry ... or starts hopping the rear tires in any part of the corner. When you experience either of these ... soften the bleed back up ... until these conditions stop.
5. If the car is loose on corner entry upon initial dive under braking ... AKA landing on the bump stops ... you can adjust the front shock compression valving stiffer until it stops. Do not stiffen the compression adjuster anymore than it needs, as this adds hysteresis into the suspension. Chose another suspension tuning option first if it is available.
6. If the car is tight/pushy on corner entry upon initial turn-in ... you can adjust the rear shock compression valving stiffer until it turns betters. Do not stiffen the compression adjuster anymore than it needs, as this adds hysteresis into the suspension. Chose another suspension tuning option first if it is available.
Steps #1 & #2 will help the car turn better "mid-corner" when you're "rolling or coasting" with no brakes or throttle. We call this critical area the "Roll Through Zone." Steps #3 & #4 will provide more grip on corner exit. Pay attention to when it affects grip on entry & middle.
The middle of the corner is the highest priority. If the car won't turn well in the middle, the entry & exit are inconsequential. Don't accept any tuning change that hurts the "Roll Through Zone" handling & speed.
Do these in this order & take lots of notes. You won't be able to remember all the details accurately. I don't know any top race teams that don't use "run sheets" to keep track of changes, results, etc. Keep a report of each run, with all 4 shock settings, the handling results on corner entry (braking & turning), Middle (coast) & Exit (throttle roll on & steering unwind) ... and the differences from the previous run. You'll learn firsthand what changes do.
-------------------------------------------------------------------
Then, go back through the same process, but fine tune with 2 clicks, then 1 click until you find the best balance. Experiment with a "little here & a little there" strategy. Experiment with a "less here & more there" strategy.
Once you're "happy" with the handling ... this is your baseline set-up. Write it down & place it in a vault. Whenever you find yourself "out-to-lunch" with tuning ... go back to your baseline. If after more events & testing, you improve on your shock settings, make that your new baseline. Write it down & place it in a vault. Whenever you find yourself "out-to-lunch" with tuning ... go back to your baseline.
FYI: If you adjust any of shocks too stiff on compression or rebound, and the shock(s) prevent the suspension from following the undulations of the track surface, you lose grip on that end of the car, without gaining grip on the other end of the car. This is one tuning change that doesn't shift grip. It simply reduces grip at the wheels where the shock valving is too stiff.
Fine Tuning for Day, Track, Conditions, Etc.
Loose Entry:
• Stiffen the bleed and/or rebound valving on the rears. You "may" gain grip back on entry. If it gets better, go until the car gets loose again on corner entry & back up ... or until you run out of adjustment. If it gets worse ... stop & back up to the baseline setting ... and move on to the next step.
• If still loose ... stiffen the bleed and/or rebound valving on the rears. You "may" gain grip back on entry. If it gets better, go until the car gets loose again on corner entry & back up ... or until you run out of adjustment. If it gets worse ... stop & back up to the baseline setting ... and move on to the next step.
If still loose ...
• If you think the front end is traveling too far (not too fast) ... add equal thickness bump stop shims to each front shock.
• Reduce rear braking force with adjustable proportioning valve.
• Try braking softer & longer.
• As a last resort of shock tuning, stiffen compression on front shocks until the car grips up on entry. Don't go any stiffer than needed, as this may tighten up the roll through zone & it adds hysteresis into the suspension.
• If still loose on entry, the cure may require a stiffer front springs or sway bar rate.
Tight/Pushy Entry:
• If you are not already full soft on the front shock compression valving ... then soften compression on front shocks until the car frees up on entry. Don't go any softer than needed, as this will make the car loose on entry.
• If you think the front end is not traveling far enough ... remove equal thickness bump stop shims to each front shock.
• If still tight/pushy ... soften the bleed and/or rebound valving on the rears. Go until the car gets loose again on corner entry turning & back up ... or until you run out of adjustment.
• If still tight/pushy ... stiffen the compression on the rears. Go until the car gets loose again on corner entry turning & back up ... or until you run out of adjustment. Don't go any stiffer than needed, as this may loosen up the grip on corner exit & it adds hysteresis into the suspension.
• If still tight/pushy on entry, induce rear braking force with adjustable proportioning valve.
• If still tight/pushy on entry, try braking harder.
• If still tight/pushy on entry, the cure will require a softer front spring rate.
Loose during "roll through zone" only:
• Pinch yourself, because you're dreaming. Or, you have over slowed the race car.
• Are you sure the car isn't loose, or pushing, on entry causing the car to get loose in roll through zone only?
• This is great news ... brake softer, but the same length & increase the roll through zone speed until the car comes back to neutral handling. If it gets tight, you may need to brake slightly harder to decrease roll through zone speed & cure it.
• Ok, if it is really loose in roll through zone only ... soften up the bleed valving on the front shocks.
Tight/Pushy during "roll through zone" only:
• If you think the front end is not down on the track far enough ... remove equal thickness bump stop shims to each front shock.
• Stiffen bleed on the front shocks until the car frees up in the roll through zone.
• If still tight/pushy in the roll through zone, stiffen the rebound valving on the front shocks until the car frees up in the roll through zone.
• If still tight/pushy in the roll through zone, soften the rebound valving on the rear shocks until the car frees up in the roll through zone.
• If still tight/pushy during "roll through zone" only, brake harder, but the same length & decrease the roll through zone speed until the car comes back to neutral handling.
• If still tight/pushy in the roll through zone, the cure will require more than shock & braking adjustment.
Loose Exit:
• Stiffen the rebound valving on the rears. Go until the car gets tight on exit ... or loose on corner entry ...and back up ... or go until you run out of adjustment.
• If still needs more grip ... stiffen the bleed valving on the rears. Go until the car gets tight on exit ... or loose on corner entry ... or you experience rear wheel hop anywhere ... and back up ... or go until you run out of adjustment.
• If still loose, soften the rebound valving on front shocks until the car grips up on exit ... or gets tight in the roll through zone. Don't go any softer than needed, as this will tighten up the roll through zone.
• Do not soften the bleed valving on the front shocks UNLESS the roll through zone is awesome AND the tires spin the instant you touch the throttle.
• If still loose on exit, experiment rolling the throttle on later or slower.
• If still loose on exit, the cure will require more than a shock or driving adjustment.
Tight/Pushy Exit:
• If any adjustment range left, stiffen the bleed valving on the front shocks. Go until the car gets good on exit ... or go until you run out of adjustment.
• If still tight/pushy on exit ... and if any adjustment range left ... stiffen the rebound valving on the front shocks. Go until the car gets good on exit ... or go until you run out of adjustment.
• If still tight/pushy on exit, soften the bleed valving on the rears. Go until the car gets good on exit ... or until it hurts the entry ... or until you run out of adjustment.
• If still tight/pushy on exit, soften the rebound on the rears. Go until the car gets good on exit ... or until it hurts the entry ... or until you run out of adjustment.
• If still tight/pushy on exit, experiment rolling the throttle on later or slower.
• If still tight/pushy on exit, the cure will require more than a shock or driving adjustment.
[/b] #89
Track Tuning Techniques for Overall Handling Balance / Re: Track Tuning for Overall H...
Last post by Ron Sutton - Apr 13, 2026, 06:29 PM Ron Sutton Quick Tuning Guide:
Tuning for balance is easy, when you embrace 5 keys.
1. Get the inner, outer & middle tire temps on all four tires every run, or as often as is feasible. Record them in your note book. (We offer free templates that Ron Sutton uses.)
2. Measure all four tire pressures after every run, or as often as is feasible. Record them in your note book. Determine your car's baseline & record it.
3. Measure all four shock travels every run, or as often as is feasible. Record them in your note book. Determine your car's baseline & record it. Rear travel shows roll & front shows dive.
4. Measure all four rotor temps every run, or as often as is feasible. Record them in your note book. Determine your car's baseline & record it. Now let's tune!
5. Some track tuning you do will be to correct the dive and/or roll amounts to hit your targets. The rest of tuning you do will be to increase or decrease rear tire grip to achieve balance.
If the car is loose on entry & exit ...
* Do the rear tire temps show high or low temps in the center? If yes, adjust rear pressures.
* Is the car rolling over too far? If yes stiffen the front sway bar.
* Is the car not rolling enough? If yes, soften the rear sway bar.
* Car still not rolling enough? Lower the rear roll center and/or narrow the rear track width.
If the car is loose on corner entry only ...
* Do the rear tire temps show high or low temps in the center? If yes, adjust rear pressures.
* Is the front end dive traveling too far? If you run bump stops, simply add shims until your dive travel is on target. If you do not run bump stops, stiffening the front shock compression will help a little. If you need to reduce travel more, change to the next stiffer front springs.
* Is the car rolling too far? If yes stiffen the front sway bar.
* Is the car not rolling enough? 3 options: Lower the rear roll center, narrow the rear track and/or soften the rear sway bar.
* If the dive, roll & tire temps are good, stiffen the rebound on rear shocks for a little help. (You can go too far on rear rebound & actually make the car looser, so pay attention to this.)
* If the loose entry condition is not fixable with the tuning above, you may have too much anti-squat or too much rear brake bias. Check the brake temp bias to know which to fix.
If the car is loose on corner exit only ...
* If the rear tire temps are hotter than normal, either roll the throttle on slower or tune the car.
* Does the tire spin start instantly? Crack the throttle easier & roll the throttle on slower.
* Is the car rolling over too far? If yes stiffen the front sway bar.
* Is the car not rolling over enough? If yes, soften the rear sway bar.
* Roll angles good? Soften rebound on front shocks & stiffen rebound on rear shocks.
* Still need more grip on exit? If yes, increase the anti-squat in your rear suspension.
If the car is loose in the "roll through" section when you're off brake & gas ...
* Thank your lucky stars. Don't tune on the car. Simply carry more corner speed (by braking softer or shorter) up to the point the car starts getting tight/pushy in the middle.
If the car is tight or pushing the entire corner ...
* Do the front tire temps show high or low temps in the center? If yes, adjust front pressures.
* Check the toe-out. We know you set it at the shop. Trust us, recheck it first, before tuning.
* Is the car not rolling over enough? If yes, soften the front sway bar.
* Is the car rolling over too far? If yes stiffen the rear sway bar.
* Is the car still rolling too far? Raise the rear roll center and/or widen the rear track width.
If the car is tight or pushing on corner entry only ...
* Is the front end diving enough? If no, look at tire temps. Cooler front tire temps vs rear usually mean the driver is NOT going into the corner as deep & braking as hard as needed.
If this is the case, tune on the driver, not the car. If the driving is good ... read on:
* Do the rear tire temps show high or low temps in the center? If yes, adjust the tire pressures. * Is the front end dive traveling too little? If you run bump stops, simply remove shims until your dive travel is on target. If you are not compressing the bump stops, run softer springs.
* If you do not run bump stops, softening the front shock compression valving will help a little. If you need to increase travel more, change to the next softer front springs.
* Is the car rolling over too far? 3 options: Raise the rear roll center, widen the track width and/or stiffen the rear sway bar.
* Is the car not rolling enough? If yes, soften the front sway bar.
* If the dive, roll & tire temps are good, soften the rebound on rear shocks for a little help.
* If the tight or pushy entry condition is not fixable with the tuning above, you may have too much front brake bias. Check the brake temp bias to know for sure.
If the car is tight or pushing on corner exit only ...
* If the front tire temps hotter than normal, straighten out your corner exit line or tune the car.
* Does the tight or pushing condition start instantly? Stiffen the rebound on front shocks.
* Is the car rolling over too far? If yes stiffen the rear sway bar.
* Is the car not rolling over enough? If yes, soften the front sway bar.
* If the dive, roll & tire temps are good, stiffen rebound on front shocks & soften rebound on rear shocks for a small gain.
* Still need less grip on exit? If yes, decrease your anti-squat in rear suspension.
If the car is tight or pushing in the "roll through" section when you're off brake & gas ...
* Welcome to the most common ... and hardest to fix ... handling problem in motorsports. If you can give up a little rear grip on corner entry or exit ... use those tuning strategies mentioned earlier.
This will help you to reduce the tight/push condition in the roll through. When you have fine-tuned all you can ... and have the car balance on the edge of free on entry & exit ... and the car is still tight in the middle ... the Driver simply needs to carry less roll through speed (by braking a little harder or longer) just up to the point the car turns well in this zone.
Measure & record tire temps, psi, brake temps & shock travel & you have the key info to tune!
#90
Track Tuning Techniques for Overall Handling Balance / Re: Track Tuning for Overall H...
Last post by Ron Sutton - Apr 13, 2026, 06:22 PM Quik-Tune Adjustments
The following may sound like an advertisement for my Quik-Tune suspension components ... and it probably is to a degree. But this is my belief. Face it ... if tuning adjustments are hard to do or take too long ... they usually don't get made & we suffer through a less than optimum handling race car. RSRT Quik-Tune features are the solution!
I was a winning crew chief for almost 40 years. I know tuning on race cars can be time consuming, So I engineered all the RSRT track & race cars to be quicker, easier & predictable to tune, so you can dial in your car at any track, under any conditions.
For the rear roll center, RSRT Watts link or panhard bar, you can tune your rear roll center height, with a 1/2" ratchet, to balance the handling of your race car in seconds, not minutes. You simply open the trunk & adjust the rear roll center up for more front grip, or down for more rear grip. With our Quik-Tune Watts link, put a 1/2" ratchet in the center adjuster cone & turn it right to lower the roll center or left to raise it. You have 6" of range at the tip of your fingers.
With our Quik-Tune double adjustable panhard bar, you have two adjuster cones. 4" range on the driver/chassis side & 6" range on the passenger/axle side. In addition to the option of adjusting both evenly, if you need more rear grip & less front grip turning one way & more front grip & less rear grip turning the other way, you can do that with panhard bar adjustments.
If you need more rear grip on left hand corners, adjust the driver side lower. If you need more rear grip on right hand corners, adjust the passenger side lower. If you need more front grip on left hand corners, adjust the driver side higher. If you need more front grip on right hand corners, adjust the passenger side higher. Combinations of these also work well.
Using the same 1/2" ratchet, you can adjust ride heights, corner weights & cross weights on RSRT's Quik-Tune jack screw coil-over shock mounts. Plus, this does NOT affect the bump stop gap or travel range of the shocks.
Adjusting the ride heights, front or rear heights individually & dialing in the optimum crossweight on the scales ... or at the track ... is much quicker & easier with Jack-Screw Adjusters on each coil-over. No more getting down in the suspension to loosen the lock collar on the coil-over ... turning it with a spanner wrench ... busting some knuckles during the process ... and retightening the lock collar ... multiple times until you get it right!
Simply loosen the 1-1/8" jam nut on the jack screw, put a 1/2" ratchet in the top of the jack screw adjuster, then turn it right to raise the car or load that corner more. Turn it left to lower the car or load that corner less.
Raising or lowering the whole car, or just the front or rear, has never been quicker or easier. Same with adjusting the crossweight to increase total grip on corners of one direction, while simultaneously reducing total grip on opposite corners.
Need more front & rear grip on left hand corners & less on right hand corners? Adjust the left front & right rear jack screws down to load the tires more & adjust the right front & left rear THE EXACT SAME AMOUNT, but up to load the tires less. Ride heights will not change. Need the opposite effect? Do the opposite.
Use the 1/2" Ratchet with a 3/4" Socket & 3/4" wrench to tune the rear sway bar for Mid-corner tuning. Need more mid-corner grip, simply soften the rear sway bar. Need the Car to free up & turn better in the middle? Adjust the rear sway bar stiffer. Remember you can split holes to really fine tune the change.
You can use the same 1/2" Ratchet with a 3/4" socket & 3/4" wrench on the front sway bar as well. Track conditions change? You can move 1 link 1 hole & make a measurable change (about 100#) to overall handling.
Need more front grip? Soften the bar. Need more rear grip? Stiffen the front bar. Car rolling too much & getting loose in the high speed corners? Stiffen the front bar. Car not rolling enough & pushing in the slow corners? Soften the bar.
Adjusting the Quik-Tune RSRT 3-link anti-squat is also quick & easy. Through the passenger door, put the 1/2" ratchet in the adjuster cone & turn it right to increase the anti-quat (more rear grip on exit, but less on entry) or left to reduce it (more rear grip on entry, but less on exit). You have 4" of range of the front top link pivot point to find the optimum compromise.
Have our Quik-Tune Decoupled 3-Link? No compromises. You're tuning the Accel link for corner exit only, since the Decel link works separately to create amazing rear grip on corner entry (under braking). Need more rear grip on exit? Turn the adjuster cone to the right to increase anti-squat. Got too much rear grip on corner exit ... and the car is pushing to the outside of the track under throttle? Turn the adjuster cone to the left to decrease anti-squat.
Adjusting the rear track width is as quick as unbolting the two rear tires. You can add wheel spacers to widen the rear track width, shifting grip from the rear tires to the front tires for better turning. Or, you remove wheel spacers to narrow the track width shifting grip from the front tires to the rear tires for better acceleration & grip upon corner turn in. Our strategy is to start with 1/2" spacers to match thew front track width. Then you can narrow or widen up to 1".
Adjusting the shock valving is the go-to tuning tool when you need to improve handling at driving "transitions" like initial throttle pick up, initial brake application, initial steering turn-in, etc.
All RSRT race shocks are easily adjustable with a dial, pin wheel or knob. Singles are adjustable on the low speed rebound side, which is the number one tuning tool. Doubles are adjustable on rebound & compression. Typically, adding rebound increases grip on that end.
Tuning the bump stop shims (aka packers) is quick & easy. Need more rear grip on corner entry, under braking? Add equal shims on both sides. Need the car to turn better on corner entry? Remove equal shims on both sides. Got a tricky track with one direction of corners giving you grief? Add or remove bump stop shims on just one corner.
Adjusting steering ratio is not possible with most spindles. With RSRT spindles, you can dial in the steering speed (ratio) you want for personal preference, or track size. Simply swap the steering slugs shorter for quicker steering, longer for slower steering, in minutes. Changing the steering arm slugs can be done in 2 minutes if you're prepared.
As track conditions change throughout the event, or when you run different tracks, having quick & easy tuning methods is crucial. There are many proven methods, if you build them into your car from the start. I'll outline many here:
Quik-Tune Watts or Panhard Bar:
*Adjusting up shifts grip to the front tires & down shifts grip to rear tires
Quik-Tune 3-Link Top Link (or Accel Link on Decoupled 3-Links):
*Adjusting the front down provides more rear grip at throttle roll on & up provides more rear grip later on long, sweeping corner exits
Quik-Tune Coil-Over Adjusters:
*Adjusting the LF & RR up & the RF & LR down equal amounts tightens the car on RH corners & frees the car on LH corners without affecting the ride height of the car.
*Adjusting the RF & LR up & the LF & RR down equal amounts tightens the car on LH corners & frees the car on RH corners. Perfect for courses with a majority of turns one direction & a minority of turns the other direction
Cockpit Coil-Over Wedge Adjuster:
*Achieves the same goal as above, except can be adjusted by driver on track, to dial in handling for that session. With the hydraulic weight jacker set in the middle, the driver can shift grip to help either RH or LH corners with a knob turn on the console

Bump Stops on Front Shocks:
*Increasing shims loads the rear tires harder increasing rear grip on corner entry under braking & reducing shims loads the fronts more increasing front grip on entry
*Adding a shim to only one side (LF for example) adds dynamic wedge on corner entry & tightens the car on RH corner entry & frees the car on LH corner entry
Spring Rubbers:
*Creating our neutral setup at the shop with moderate rate spring rubbers already in the rear coil-over springs provides us a quick track tuning tool
*Changing to stiffer rate spring rubbers in the rear shifts grip to the front tires & softer spring rate rubbers (or removed altogether) shifts grip to the rear tires
Basic Shock Tuning:
*Adjust the shock valving when the handling issue only happens on TRANSITION from or to throttle, braking and/or steering input.
*Stiffening the front shock compression and/or rear shock rebound tightens the car on corner entry & at brake release. Softening the front compression and/or rear rebound frees the car on entry & at brake release.
*Softer front rebound and/or stiffer rear rebound tightens the exit & vice versa.

Rear Wheel Spacers:
*When we have an extra inch width in the rear wheel tubs, we build the floater rear end (5/8" studs) 1" narrower on each side & setup our neutral baseline to run 1/2" wheel spacers. At the track, decreasing or removing the spacers shifts grip to the rear tires & increasing the spacer thicknesses (1" Max) shifts grip to the front tires.

Quik-Tune Sway Bars:
*Adjusting the links to make the arms longer makes the bar softer, shifts grip to that end of the car & shorter makes the bar stiffer, shifting grip to the other end of the car
*For fine tuning you can adjust just one side for half the change


Brake Bias Cockpit Cable Adjuster:
*Adjusting the brake bias towards the front brakes tightens up the race car under hard braking & shifting bias to the rears frees up the car under hard braking.


The following may sound like an advertisement for my Quik-Tune suspension components ... and it probably is to a degree. But this is my belief. Face it ... if tuning adjustments are hard to do or take too long ... they usually don't get made & we suffer through a less than optimum handling race car. RSRT Quik-Tune features are the solution!
I was a winning crew chief for almost 40 years. I know tuning on race cars can be time consuming, So I engineered all the RSRT track & race cars to be quicker, easier & predictable to tune, so you can dial in your car at any track, under any conditions.
For the rear roll center, RSRT Watts link or panhard bar, you can tune your rear roll center height, with a 1/2" ratchet, to balance the handling of your race car in seconds, not minutes. You simply open the trunk & adjust the rear roll center up for more front grip, or down for more rear grip. With our Quik-Tune Watts link, put a 1/2" ratchet in the center adjuster cone & turn it right to lower the roll center or left to raise it. You have 6" of range at the tip of your fingers.
With our Quik-Tune double adjustable panhard bar, you have two adjuster cones. 4" range on the driver/chassis side & 6" range on the passenger/axle side. In addition to the option of adjusting both evenly, if you need more rear grip & less front grip turning one way & more front grip & less rear grip turning the other way, you can do that with panhard bar adjustments.
If you need more rear grip on left hand corners, adjust the driver side lower. If you need more rear grip on right hand corners, adjust the passenger side lower. If you need more front grip on left hand corners, adjust the driver side higher. If you need more front grip on right hand corners, adjust the passenger side higher. Combinations of these also work well.
Using the same 1/2" ratchet, you can adjust ride heights, corner weights & cross weights on RSRT's Quik-Tune jack screw coil-over shock mounts. Plus, this does NOT affect the bump stop gap or travel range of the shocks.
Adjusting the ride heights, front or rear heights individually & dialing in the optimum crossweight on the scales ... or at the track ... is much quicker & easier with Jack-Screw Adjusters on each coil-over. No more getting down in the suspension to loosen the lock collar on the coil-over ... turning it with a spanner wrench ... busting some knuckles during the process ... and retightening the lock collar ... multiple times until you get it right!
Simply loosen the 1-1/8" jam nut on the jack screw, put a 1/2" ratchet in the top of the jack screw adjuster, then turn it right to raise the car or load that corner more. Turn it left to lower the car or load that corner less.
Raising or lowering the whole car, or just the front or rear, has never been quicker or easier. Same with adjusting the crossweight to increase total grip on corners of one direction, while simultaneously reducing total grip on opposite corners.
Need more front & rear grip on left hand corners & less on right hand corners? Adjust the left front & right rear jack screws down to load the tires more & adjust the right front & left rear THE EXACT SAME AMOUNT, but up to load the tires less. Ride heights will not change. Need the opposite effect? Do the opposite.
Use the 1/2" Ratchet with a 3/4" Socket & 3/4" wrench to tune the rear sway bar for Mid-corner tuning. Need more mid-corner grip, simply soften the rear sway bar. Need the Car to free up & turn better in the middle? Adjust the rear sway bar stiffer. Remember you can split holes to really fine tune the change.
You can use the same 1/2" Ratchet with a 3/4" socket & 3/4" wrench on the front sway bar as well. Track conditions change? You can move 1 link 1 hole & make a measurable change (about 100#) to overall handling.
Need more front grip? Soften the bar. Need more rear grip? Stiffen the front bar. Car rolling too much & getting loose in the high speed corners? Stiffen the front bar. Car not rolling enough & pushing in the slow corners? Soften the bar.
Adjusting the Quik-Tune RSRT 3-link anti-squat is also quick & easy. Through the passenger door, put the 1/2" ratchet in the adjuster cone & turn it right to increase the anti-quat (more rear grip on exit, but less on entry) or left to reduce it (more rear grip on entry, but less on exit). You have 4" of range of the front top link pivot point to find the optimum compromise.
Have our Quik-Tune Decoupled 3-Link? No compromises. You're tuning the Accel link for corner exit only, since the Decel link works separately to create amazing rear grip on corner entry (under braking). Need more rear grip on exit? Turn the adjuster cone to the right to increase anti-squat. Got too much rear grip on corner exit ... and the car is pushing to the outside of the track under throttle? Turn the adjuster cone to the left to decrease anti-squat.
Adjusting the rear track width is as quick as unbolting the two rear tires. You can add wheel spacers to widen the rear track width, shifting grip from the rear tires to the front tires for better turning. Or, you remove wheel spacers to narrow the track width shifting grip from the front tires to the rear tires for better acceleration & grip upon corner turn in. Our strategy is to start with 1/2" spacers to match thew front track width. Then you can narrow or widen up to 1".
Adjusting the shock valving is the go-to tuning tool when you need to improve handling at driving "transitions" like initial throttle pick up, initial brake application, initial steering turn-in, etc.
All RSRT race shocks are easily adjustable with a dial, pin wheel or knob. Singles are adjustable on the low speed rebound side, which is the number one tuning tool. Doubles are adjustable on rebound & compression. Typically, adding rebound increases grip on that end.
Tuning the bump stop shims (aka packers) is quick & easy. Need more rear grip on corner entry, under braking? Add equal shims on both sides. Need the car to turn better on corner entry? Remove equal shims on both sides. Got a tricky track with one direction of corners giving you grief? Add or remove bump stop shims on just one corner.
Adjusting steering ratio is not possible with most spindles. With RSRT spindles, you can dial in the steering speed (ratio) you want for personal preference, or track size. Simply swap the steering slugs shorter for quicker steering, longer for slower steering, in minutes. Changing the steering arm slugs can be done in 2 minutes if you're prepared.
As track conditions change throughout the event, or when you run different tracks, having quick & easy tuning methods is crucial. There are many proven methods, if you build them into your car from the start. I'll outline many here:
Quik-Tune Watts or Panhard Bar:
*Adjusting up shifts grip to the front tires & down shifts grip to rear tires
Quik-Tune 3-Link Top Link (or Accel Link on Decoupled 3-Links):
*Adjusting the front down provides more rear grip at throttle roll on & up provides more rear grip later on long, sweeping corner exits
Quik-Tune Coil-Over Adjusters:
*Adjusting the LF & RR up & the RF & LR down equal amounts tightens the car on RH corners & frees the car on LH corners without affecting the ride height of the car.
*Adjusting the RF & LR up & the LF & RR down equal amounts tightens the car on LH corners & frees the car on RH corners. Perfect for courses with a majority of turns one direction & a minority of turns the other direction
Cockpit Coil-Over Wedge Adjuster:
*Achieves the same goal as above, except can be adjusted by driver on track, to dial in handling for that session. With the hydraulic weight jacker set in the middle, the driver can shift grip to help either RH or LH corners with a knob turn on the console
Bump Stops on Front Shocks:
*Increasing shims loads the rear tires harder increasing rear grip on corner entry under braking & reducing shims loads the fronts more increasing front grip on entry
*Adding a shim to only one side (LF for example) adds dynamic wedge on corner entry & tightens the car on RH corner entry & frees the car on LH corner entry
Spring Rubbers:
*Creating our neutral setup at the shop with moderate rate spring rubbers already in the rear coil-over springs provides us a quick track tuning tool
*Changing to stiffer rate spring rubbers in the rear shifts grip to the front tires & softer spring rate rubbers (or removed altogether) shifts grip to the rear tires
Basic Shock Tuning:
*Adjust the shock valving when the handling issue only happens on TRANSITION from or to throttle, braking and/or steering input.
*Stiffening the front shock compression and/or rear shock rebound tightens the car on corner entry & at brake release. Softening the front compression and/or rear rebound frees the car on entry & at brake release.
*Softer front rebound and/or stiffer rear rebound tightens the exit & vice versa.
Rear Wheel Spacers:
*When we have an extra inch width in the rear wheel tubs, we build the floater rear end (5/8" studs) 1" narrower on each side & setup our neutral baseline to run 1/2" wheel spacers. At the track, decreasing or removing the spacers shifts grip to the rear tires & increasing the spacer thicknesses (1" Max) shifts grip to the front tires.
Quik-Tune Sway Bars:
*Adjusting the links to make the arms longer makes the bar softer, shifts grip to that end of the car & shorter makes the bar stiffer, shifting grip to the other end of the car
*For fine tuning you can adjust just one side for half the change
Brake Bias Cockpit Cable Adjuster:
*Adjusting the brake bias towards the front brakes tightens up the race car under hard braking & shifting bias to the rears frees up the car under hard braking.